How To Replace iPhone 11 Pro Max Rear Facing Cameras Step-by-Step Guide
Duration: 45 minutes
Steps: 32 Steps
Hey there! So, we’ve noticed you’re tackling this repair on your own, and that’s awesome! Just to give you a friendly reminder, if you ever get stuck or feel a bit unsure, there’s no need to stress. Our team at Salvation Repair is always here to support you. In case you find yourself needing a hand, you can always schedule a repair. We’re here for you and can’t wait to see you rock this repair!
Get ready to tackle the challenge of swapping out the rear cameras on your iPhone 11 Pro Max! You’ll be replacing all three camera modules at once, making it a breeze. If you need help, you can always schedule a repair.
Step 1


Hey there! Before you dive into the repair fun, make sure your iPhone battery is feeling a bit drained – below 25% is the sweet spot. We definitely want to avoid any explosive surprises! 🔋💥
Removing the display from your iPhone? Just a heads up: it’s going to mess with those waterproof seals. Be sure to have some replacement seals on hand before you dive deeper, or be super cautious about keeping your iPhone away from any liquids if you decide to put it back together without swapping out the seals.
– Hey there! Let’s kick things off by powering down your iPhone.
– Grab your tools and say goodbye to those two 6.7 mm-long pentalobe screws at the bottom of your iPhone.
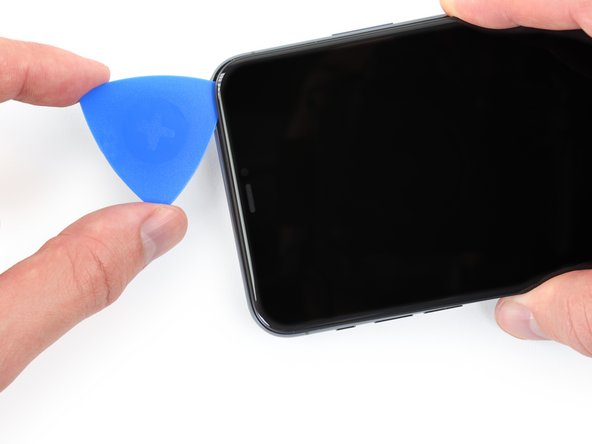
Step 2


Don’t push the opening pick in too deep! Let’s mark it first to keep your device safe from harm.
– Grab your trusty opening pick and measure out 3 mm from the tip. Give it a little mark with a permanent marker so you know where to go!
Step 3


Put on those safety glasses! They’ll keep your peepers safe from any rogue glass that might decide to escape during the repair.
If your iPhone’s screen is looking a bit worse for wear, let’s keep things safe and sound! Grab some tape and cover that glass to avoid any further mishaps and protect yourself while you tackle the repair.
– Start by laying down some overlapping strips of clear packing tape over the iPhone’s screen until the entire face is nicely covered. It’s like giving your phone a cozy blanket!
– If the suction cup isn’t playing nice in the next few steps, no worries! Just grab a sturdy piece of tape (duct tape works wonders) and fold it into a handle to lift the screen instead. You’ve got this!
Step 4


Get ready for some fun! The next three steps showcase the amazing Anti-Clamp tool, specially designed to make the opening process a breeze. And remember, if you’re not using the Anti-Clamp, simply jump ahead three steps to find an alternative method. Keep that positive energy flowing!
– Give that blue handle a little tug back to free the Anti-Clamp’s arms.
– Gently slide those arms over the edge of your iPhone, choosing left or right—your call!
– Place the suction cups near the bottom edge of your iPhone—one on the front and one on the back, like a perfect little duo.
– Squeeze those cups together to create a solid grip on your iPhone. You’ve got this!
Step 5


– Give that blue handle a gentle tug forward to lock those arms in place.
– Now, twist that handle a full 360 degrees or until you see those suction cups start to stretch out.
– Keep an eye on those suction cups to make sure they’re staying in sync. If they start to drift apart, just loosen them a bit and realign those arms like a pro.
Step 6


– Warm up that iOpener and slide it through the arms of the Anti-Clamp like a pro.
– Bend the iOpener so it rests comfortably on the bottom edge of your iPhone.
– Take a breather for a minute to let the adhesive loosen up and create a little opening.
– Gently slide an opening pick into the gap between the screen and the plastic bezel, avoiding the screen itself.
– Feel free to skip the next three steps; you’ve got this!
Tools Used


Step 8


– If you’re rolling with just one suction handle, stick it to the bottom edge of your phone, but steer clear of that curvy glass section.
Tools Used

Step 9


– Go ahead and give that suction cup a good tug, applying steady pressure. This will create a little gap between the front panel and rear case.
– Next up, grab yourself an opening pick and slide it right on into that gap.
Whoo-hoo, let’s crack open this cool gadget! This sticky adhesive holding the display is a real beast, so it may take some muscle Herculean power to break it free. If you’re stuck, just keep heating and gently wiggling the screen like a happy little worm until you create a tasty enough gap for your handy-dandy tool to slide on in! If you need help, you can always schedule a repair!_roll_0
Step 10


– Carefully glide the opening pick around the lower left corner and along the left edge of the iPhone, cutting through the adhesive that’s keeping the display secured. Keep it steady, and you’ll be on your way to a successful repair!
Step 11

Be careful! There’s a sensitive cable running along the right edge of your iPhone. Avoid inserting your pick here, as it could cause some damage to that cable.
Step 12


– Pop your pick back into the bottom edge of the iPhone and gracefully glide it up the right side to keep peeling away that pesky adhesive.
Step 13


The top edge of the display is held in place with a combination of glue and clips, adding a bit of puzzle-solving fun to your repair journey!
– Carefully nudge the right edge of the display down a tad, heading towards the Lightning port.
– Slide your pick into the top-right corner of your phone with a gentle touch.

Step 15

– Give that little nub on the suction cup a gentle tug to pop it off the front panel. You’ve got this!
Step 16


Hold your horses on fully separating that display! There are some delicate ribbon cables still hanging out with the iPhone’s logic board, so let’s keep them together for now.
– Gently lift the iPhone’s display from the left side, just like opening a book—easy peasy!
– Prop the display up against something sturdy so you can work on your phone hands-free. You’ve got this!
– When it’s time to put everything back together, set the display in place, align those clips along the top edge, and press the top down gently before giving the rest a little snap. If it feels stubborn, just check those clips around the edge—make sure they’re not feeling a bit bent!
Step 17


– Unscrew those two 1.3 mm long Y000 screws holding the battery cover bracket like a pro!
– While you’re at it, this is a perfect moment to power on your iPhone and check if everything’s running smoothly before you seal that display back up. Just remember to power down completely before diving back into your repair adventure!
Step 18

– Just kick that bracket out of there!
Step 19


– Time to work some magic with your trusty spudger or a clean fingernail. Gently pry the battery connector up from its cozy socket on the logic board.
– Give that connector a little bend away from the logic board so it doesn’t sneakily sneak back and power up the phone while you’re working your repair mojo.
Tools Used

Step 20


– Grab your trusty Y000 driver and get ready to tackle those six 1.3 mm screws holding the logic board cover bracket in place. You’ve got this!
Step 21

– Get that bracket outta there!


Step 25


– Grab your trusty Y000 driver and get ready to bid farewell to those two 1.5 mm screws hanging out on the left side of the rear camera cover. Let’s show them who’s boss!
Step 26


– Take off the Face ID flex cable bracket. It’s like giving your device a little breather!
– When you’re putting everything back together, make sure to reattach the bracket in a way that keeps those flex cables cozy and separate from the battery. Just a friendly tip: avoid trying to squeeze it between the flex cables and the logic board/camera area.
Step 27


– Grab your trusty Y000 driver and unscrew those two 1.2 mm screws holding the rear camera cover snugly in place. You’ve got this!
Step 28


– Start by gently lifting the camera cover from the side closest to the battery, and give it a little tug to remove it.
– When it’s time to put the camera cover back on, just follow the pictures in reverse: First, lower the outer edge until those cheeky little tabs on the cover snap snugly into the bracket of the camera module. Then, simply hinge the cover shut with ease.
Step 29


– Grab a spudger or your trusty fingernail and gently lift the first two camera cable connectors straight up from their sockets. You’ve got this!
Tools Used


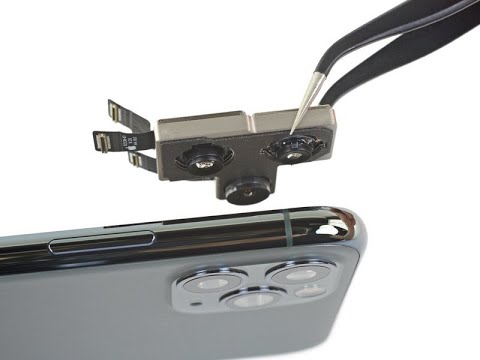
Step 32

– Gently detach the rear-facing camera assembly and set it aside with care.