iPhone 8 Plus Battery Replacement Guide: Step-by-Step DIY Tutorial
Duration: 45 minutes
Steps: 41 Steps
Heads up! Make sure you’ve got your tools ready and your focus hat on, because we’re diving into some tech magic here. Remember, if things get tricky, you can always swing by schedule a repair for some backup!
Ready to give your iPhone 8 Plus a battery boost? This guide’s got your back! If you’re dealing with a puffy battery, handle it like it’s a delicate puff pastry. You’ll be taking off the display assembly to sidestep any oopsie moments with the display cables. Confident in your skills and want to skip the display detaching dance? Go for it, just be gentle with those cables. Pro tip: hold off yanking out those adhesive strips securing the battery right after opening the phone. Instead, remove the Taptic Engine first to dodge any accidental adhesive snags or awkward angles. Once you’re done, treat your iPhone to a full battery calibration spa day: charge it up to 100%, let it linger on the charger for a couple more hours, then run it down completely before giving it an uninterrupted charge back to 100%. If things get tricky, you can always schedule a repair.
Step 1

– Let’s power down your iPhone to kick things off safely—no surprises, please!
– Whip out your trusty screwdriver and remove those two sneaky 3.5 mm pentalobe screws holding the fort at the bottom edge of your iPhone.
Kick things off by letting your iPhone’s battery power down to under 25%. Why? Because a full battery is like a party animal — too much energy and it might just go wild (think fire or explosion if it gets poked by accident).
Cracking open your iPhone’s display will take a toll on its waterproof seals. You might want to have some replacement seals on standby before moving ahead, or just be super careful about keeping your iPhone dry if you plan to put it back together without a swap. Dive in, but let’s keep it splash-free!
Step 2


Don’t shove that pick too far in! Just a little nudge is enough. Mark your pick like we show here to keep your gadget safe and sound.
– Grab your marker and measure a cool 3 mm from the tip of the opening pick, then give it a little mark. It’s like putting a tiny tattoo on your tool!
Step 3


Pop on some safety glasses to keep your peepers safe from any rogue glass during this fabulous fix!
Got a cracked screen? No worries! Just slap some tape over that glass to keep the cracks from spreading and save your fingers from a glassy surprise during your repair adventure.
– Cover the entire face of your iPhone with overlapping strips of clear packing tape. The goal is to cover every bit of the screen.
– Having trouble getting that suction cup to stick? No worries! Just grab a piece of strong tape, like duct tape, make a handle, and use it to lift the screen.
Step 4


The following trio of steps will show you how to use the Anti-Clamp, a nifty gadget we cooked up to simplify the opening process. If you’re not rocking the Anti-Clamp, just hop down three steps for another awesome technique!
– Yank the blue handle back like a pro to free up those Anti-Clamp arms.
– Gently slide the arms onto either the left or right side of your iPhone—dealer’s choice!
– Pop the suction cups just above the home button at the bottom of your iPhone, one on the front and one on the back, like a sandwich.
– Give those cups a good squeeze to get them hugging your iPhone tight.
Step 5


– Yank the blue handle forward to snap the arms into place.
– Give the handle a good whirl clockwise—spin it a full 360 degrees or until you see those cups getting a stretch on.
– Keep your eyes on those suction cups; they should stay in sync. If they start dancing out of line, just ease up on the suction a bit and guide them back to friendship.
Step 6


– Warm up an iOpener and sneak it through the arms of the Anti-Clamp like you’re threading a needle.
– Fold the iOpener back on itself so it cozies up on the bottom edge of your iPhone.
– Hang tight for a minute to let the adhesive loosen up and coax out an opening gap.
– When the Anti-Clamp gives you a nice big gap, slide an opening pick under the screen to get started.
– Go ahead and jump over the next three steps.
Tools Used

Step 7

– Grab your hairdryer or get an iOpener ready. Give the lower edge of your iPhone a warm-up session for about 90 seconds to loosen the sticky stuff underneath. It’s like prepping for a mini workout!
Tools Used
Step 8


– Pop a suction cup onto the lower half of the front panel, just above the home button. It’s like giving your device a little window cleaner’s kiss!
Step 9


– Give the suction cup a hearty tug upwards to create a small opening between the front panel and the rear case. It’s like opening a jar for the first time!
– Slide an opening pick or your favorite thin pry tool just a smidge into that new gap you’ve made. Easy does it!
Step 10


– Wiggle your pick around the corner and cruise up the left side of the phone towards the volume buttons and the silent switch, parting the pesky adhesive that’s clinging onto the display.
– Pause your groove just before you hit the top left corner of the display.
Step 11

Heads up! There’s a sneaky cable along the right edge of your iPhone. Be a ninja with your pick, and steer clear of that area to avoid any cable catastrophes!
Step 12


– Pop your tool back in at the lower right corner of your iPhone. Glide it around the corner and up the right side to whoosh away the adhesive.
Step 13

Remember, don’t swing that display open more than 15 degrees! We wouldn’t want to stretch or snap those delicate ribbon cables.
– Give that suction cup a smooth pull upwards to pop open the bottom edge of the display. You got this!

Step 15


– Wiggle an opening pick under the display along the top edge of your phone to loosen up that stubborn adhesive.
Step 16


– Gently nudge the display assembly a smidge downward (steering clear of the top edge of the phone) to free it from the pesky clips that are holding onto the rear case.


Step 18


– Get ready to say goodbye to those four Phillips (JIS) screws holding the lower display cable bracket snug to the logic board. Here’s a fun fact: they come in different lengths!
– ‘Keep your eye on the prize’ is good advice in life and when dealing with screws. Make sure each one returns to its rightful place during reassembly. Putting a screw in the wrong spot is a big no-no, so let’s avoid that, shall we?

Step 20


– Pop the battery connector off its throne on the logic board using the pointy end of a spudger.
– Give the connector cable a little upward flair to keep it from sneaking back and powering up the phone while you’re in the zone fixing it.
Tools Used

Step 21


– Grab your spudger or use your trusty fingernail to gently disconnect the large lower display connector by prying it straight up from its socket. Easy does it!
– When reconnecting press connectors like this, start by pressing down on one side until you hear a satisfying click, then repeat on the other side. Remember, avoid pressing down in the center. Keep things aligned because even a tiny misalignment can bend the connector, and we don’t want that kind of drama!
Tools Used
Step 22


– Unplug the next lower display cable connector right behind the one you just freed up. Keep the groove going!
Step 23


– Unscrew the two tri-point Y000 screws holding down the bracket on top of the front panel sensor assembly connector.
Step 24

– Whip off that stylish bracket covering the front panel sensor assembly connector!


Step 28

– Yo, it’s time to pop off that bracket!
Step 29


– Grab your opening pick and show that sticky antenna flex cable who’s boss! Gently wiggle it free from the clutches of the speaker’s top surface.
Step 30


– Grab your spudger and give that antenna flex cable a gentle nudge to disconnect it from the logic board. Easy peasy!
Tools Used
Step 31


– Grab your spudger and gently lift to disconnect the far end of the antenna flex cable right beside the Lightning Port. You’ve got this!
Tools Used
Step 32

– Time to part ways with the Wi-Fi diversity antenna! Gently detach it and set it aside.


Step 34


– Grab your spudger and gently pop off the Taptic Engine flex cable like a pro. You’re doing great!
Tools Used

Step 36

The iPhone 8 Plus holds its battery in place with four stretchy adhesive strips—two partying at the top and two chilling at the bottom.
– Each strip of sticky stuff comes with a nifty black pull-tab at the end, just chilling on the front side of the battery.


Step 38


Keep those adhesive strips smooth and straight while you work; if they get twisted or wrinkled, they’ll stick to each other and snap instead of coming out nice and clean.
Also, resist the urge to press down on the battery while pulling the strips. Applying pressure can create tricky spots that might tear the adhesive.
If any adhesive strips break off under the battery and you can’t grab them, work on removing the remaining strips, then continue with the steps outlined below.
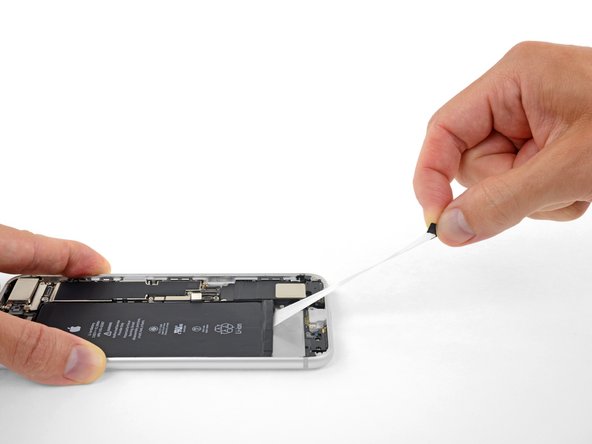
– Gently tug on one end of the battery adhesive tab, pulling it downwards toward the base of the iPhone. Take it slow and easy!
– Keep the tension consistent, smoothly pulling the strip until it frees itself from the snug space between the battery and the rear case. Aim to pull at a shallow angle to avoid hooking it on other iPhone internals.
– Oops! If the adhesive tabs decide to snap, no worries! Just pinch the remaining adhesive with your fingers or some blunt tweezers and keep on pulling.
Tools Used

Step 39


If a sneaky adhesive strip decided to break off and hide under the battery, don’t worry! Just shimmy on down to the next step.
– Go ahead and repeat the previous steps to remove the remaining three adhesive strips. It’s like a fun little dance routine for your fingers!
– If all the adhesive strips came off without a hitch, feel free to skip the next step and give yourself a high five!
Step 40


Oops! Did a sticky situation leave your battery glued down? No worries! Just dribble a little isopropyl alcohol (90% or better) around the battery where the strip got stubborn. Give it a minute, then gently lift the battery free like a pro.
Still stuck? No problemo! Either heat up the rear case right behind the battery with a trusty hair dryer or an iOpener to loosen that pesky adhesive.
Or, grab some strong string like dental floss or a thin guitar string, and sneak it under the battery to wiggle it free with a smooth, rocking motion.
Tools Used
Step 41

– Pop out that battery like you’re popping the top on a soda can!
– Got a new battery wrapped up like a burrito? Unwrap that baby before you pop it in.
– If your phone’s still got some boozy bath residue inside, give it a gentle wipe or let it air out before you install the new power pack.
– Before sticking that new battery down for good, hook it up temporarily to make sure it fits like a glove in its cozy little nook.
– No sticky stuff on your new battery? No worries! Check out this guide to get it fixed up with some snazzy adhesive strips.
– All done? Great! Now let’s give your device a fresh start with a force restart to keep things smooth.