Replace iPhone 11 Pro Max Front Camera Assembly Tutorial
Duration: 45 minutes
Steps: 28 Steps
Face ID has decided to take a little break!
Ready to give your iPhone 11 Pro Max’s selfie cam a facelift? Follow along with this simple guide to replace the front camera assembly. Keep in mind, swapping out this part means saying ‘see ya later’ to Face ID, but we’ll get that selfie cam back in action for you! Just remember, only the pros at Apple or an ‘authorized’ Apple tech can bring back Face ID. If you need help, you can always schedule a repair.
Step 1


Hey there! Before you dive in, make sure to drain that iPhone battery to below 25%. A fully charged lithium-ion battery is like a firecracker waiting to go off if it gets punctured. Let’s keep things safe and sound while we fix it up!
Before you start, make sure you’ve got some replacement seals on hand. That way, you can keep your iPhone’s waterproofing intact. If you’re not planning to replace them, just be extra careful not to get any liquids in there when you reassemble. And if you’re feeling unsure, don’t worry – you can always schedule a repair with the pros at Salvation Repair.
– Hey there, superstar! Make sure to turn off your iPhone before we get this party started!
– Next up, let’s say adios to those two 6.7 mm-long pentalobe screws hanging out at the bottom of your iPhone. It’ll be a breeze!
Step 2


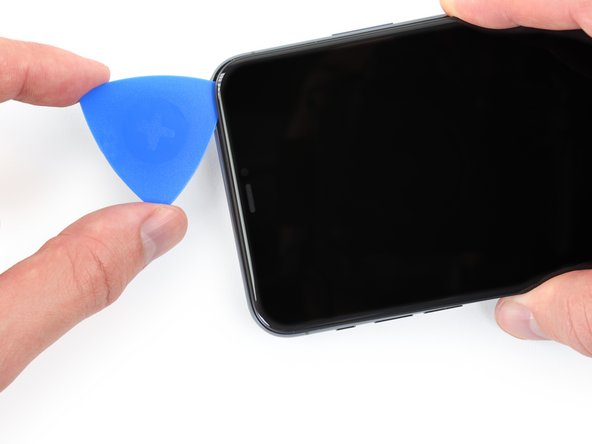
Be careful not to insert your opening pick too far, or you might end up damaging your device. To avoid any mishaps, let’s take a quick step to mark your pick and keep your device safe. If you need help, you can always schedule a repair
– Take a fun little trip down to the tip and measure out 3 mm. Give your opening pick a stylish mark with a permanent marker to keep things on point.
Step 3


Pop on some safety glasses to keep your peepers safe from any sneaky glass shards that might escape during the repair.
Got a cracked screen on your iPhone? No worries! To keep that glass from shattering further and to keep yourself safe while you work your magic, just grab some tape and cover it up. You’re on your way to a smooth fix!
– Start by placing layers of clear packing tape over your iPhone’s screen, making sure to cover the entire front. You’re creating a protective shield!
– If the suction cup isn’t cooperating in the next steps, no worries! Just grab a sturdy piece of tape, like duct tape, fold it into a handle, and use that to lift the screen instead.
Step 4


Time to bring out the Anti-Clamp, our trusty sidekick specially crafted to simplify the opening process. If you don’t have an Anti-Clamp on hand, just skip ahead three steps for an alternative approach.
– Give that blue handle a gentle tug back to release the Anti-Clamp’s arms.
– Slide those arms over the left or right edge of your iPhone like a pro.
– Place the suction cups close to the bottom edge of your iPhone—one on the front and one on the back, just chilling.
– Squeeze the cups together to create a solid grip on the area you want to work on.
Step 5


– Give that blue handle a gentle tug to lock those arms in place.
– Turn the handle to the right about 360 degrees or until you see those cups start to stretch.
– Keep an eye on those suction cups to make sure they stay in line. If they ever seem like they’re taking a crooked path, just loosen them up a bit and get those arms back in sync.
Step 6


– Alrighty, folks! Time to get our heat on – grab that iOpener and snake it through the Anti-Clamp arms.
– Now, fold that iOpener to lay nice and snug on the bottom edge of your iPhone.
– Give it a min, and watch as the adhesive starts to loosen up – we’ve got a gap showing!
– Time to break out the opening pick – slide it in under that screen and plastic bezel, but don’t go for the screen itself.
– Skip ahead a few steps! You’re doing great!
Tools Used

Step 7

Applying gentle heat to the lower edge of your device will help soften the adhesive that’s holding the display in place, making it a breeze to open up. If you need some assistance, feel free to schedule a repair with us!
– Grab a hairdryer, heat gun, or your trusty iOpener and give the lower edge of your iPhone a warm hug for about a minute. This will help loosen up that pesky adhesive hiding underneath.
Tools Used
Step 8


– When using a single suction handle, stick it to the bottom edge of your phone, but steer clear of that curved glass area. You’ve got this!
Tools Used

Step 9


Alright, tackling that watertight adhesive holding the display is no joke! It’s super strong, so get ready to give it some muscle. If you’re struggling to crack it open, crank up the heat and start gently rocking that screen back and forth. This will help loosen the adhesive and give you the gap you need to slide in your tool like a pro.
– Gently pull up on the suction cup with steady pressure to create a little gap between the front panel and the rear case. You’re doing great!
– Slide an opening pick into that gap you’ve just made. Keep it smooth and steady!
Step 10


– Gently glide the opening pick around the lower left corner and up the left edge of your iPhone, carefully cutting through the adhesive that keeps the display snug and secure.
Step 11

Watch out for a sneaky little cable running along the right side of your beloved device. Make sure to avoid poking it with your tool, unless you want to give it an unexpected buzz!
Step 12


– Stick your trusty pick back in at the bottom of the iPhone, and smoothly slide it up the right side to keep separating that adhesive.


Step 15

– Give that little nub on the suction cup a gentle tug to pop it off the front panel. You’ve got this!
Step 16


Hold your horses! Don’t go fully separating the display just yet—there are some delicate ribbon cables still linking it to the iPhone’s logic board. Let’s take it slow and steady!
– Gently lift the iPhone’s display from the left side, just like flipping open a book. Easy as pie!
– Prop the display up against something sturdy so you have a nice view while you work your magic on the phone.
– When it’s time to put everything back together, position the display carefully, align those clips along the top edge, and press down gently. If it doesn’t snap into place with a satisfying click, take a moment to check those clips around the edges – they shouldn’t be bent or anything!
Step 17


– Unscrew those two 1.3 mm long Y000 screws holding the battery cover bracket in place. You’ve got this!
– Now’s a perfect time to power up your iPhone and check that everything’s working like a charm before sealing the display back on. Just remember to turn your iPhone off completely before diving back into the repair!
Step 18

– You got this! Time to remove that bracket like a pro. Almost there, champ!
Step 19


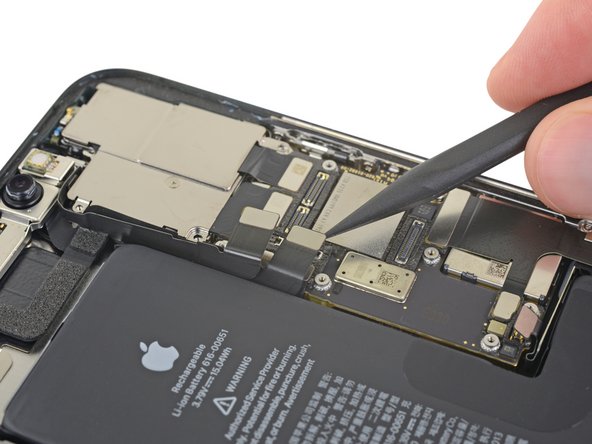
– Gently pry the battery connector up from its socket on the logic board using a trusty spudger or a clean fingernail – it’s like freeing a tiny captive!
– Now, carefully bend the connector away from the logic board to keep it from accidentally making contact and powering up your phone during the repair. If you need help, you can always schedule a repair
Tools Used

Step 20


– Grab your trusty Y000 driver and get ready to tackle those six 1.3 mm screws holding the logic board cover bracket in place. Let’s make this happen!
Step 21

– Time to say goodbye to that bracket! Go ahead and remove it.


Step 25


– Gently pry apart the Face ID dot projector and sensor cables from their cozy little spots on the logic board using a spudger or your trusty fingernail. You’ve got this!
Tools Used
Step 26


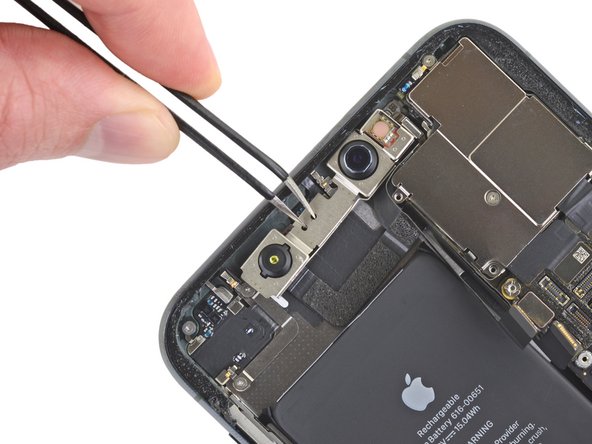
– Let’s gently nudge those Face ID cable connectors out of the way from the logic board so we can get to the selfie cam connector hiding right underneath.
– Now, give that selfie cam a little lift by gently prying its connector straight up.
Step 27


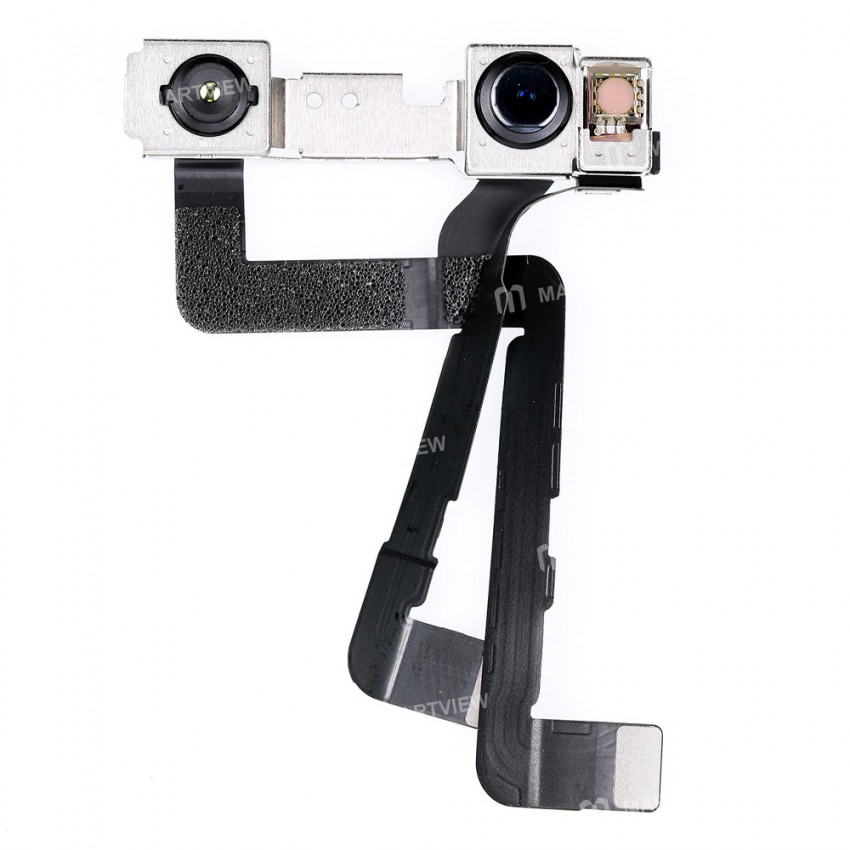
Hold on tight to the front camera assembly with those tweezers, and try to keep fingerprints off the sensors. We know it’s tricky, but you’ve got this!
– Gently nudge the front camera assembly down and to the left, just enough to set it free from its cozy little home in the enclosure.
Tools Used

Step 28

– Take out the front-facing cameras with care.