Samsung Galaxy S9 Rear Camera Bezel With Fingerprint Sensor Replacement
Duration: 45 minutes
Steps: 11 Steps
mess up the waterproof seal
lose its splash-protection superpowers
Ready to pop out the rear camera bezel and fingerprint sensor on your Samsung Galaxy S9? Let's do it! Just a heads up: cracking open your S9 means saying goodbye to its waterproof powers unless you swap in fresh adhesive seals. If you skip the adhesive, your phone will still work just fine—but don’t take it swimming. Grab some replacement adhesive for reassembly, and you’ll be back in business.
Step 1

The adhesive on the Samsung Galaxy S9 is super strong! If you're having a tough time getting it open with the iOpener, feel free to use a hair dryer, heat gun, or hot plate. Just remember to keep an eye on the heat—both the AMOLED display and the internal battery can be a bit sensitive to it. Let's keep your device safe while we work our magic!
You might want to reheating the iOpener a few times during the process to keep the adhesive nice and warm, making it easier to cut through. Just follow the iOpener instructions so you don’t accidentally overheat—warm it up, then go for it, and repeat as needed.
- Kick things off by turning off your device. Then, grab a heated iOpener and gently place it along a long edge of the phone to soften up the adhesive behind the rear glass. Keep the iOpener in place for at least two minutes to do its magic. If you need a hand along the way, you can always schedule a repair.
Tools Used

Step 2

Take a look at the adhesive inside the back cover – it's all laid out just like you see in the image. Pretty straightforward, right?
- Next up, you’ll be slicing through the adhesive that’s holding the back cover in place.
- Here’s where you’ll be cutting through the sticky stuff:
- Thicker patches of adhesive
- Thinner strips of adhesive
- Steer clear of this zone—there’s a fingerprint sensor flex cable hiding there, and you don’t want to mess with it.
Step 3


Cracked rear glass got you down? The suction cup might not want to party. Grab some strong tape to lift it up, or use a dab of superglue to stick the suction cup—just let it set before you get to work.
You might need to flex those muscles a bit, but just open a tiny gap with the suction cup so you can slip in your tool. If it’s being stubborn, hit it with some more heat to loosen up the adhesive. It cools off quickly, so don’t be shy about warming it up a few times!
- Stick a suction cup onto the back cover to get a grip. Gently lift the bottom edge with your suction cup, creating a tiny gap between the back and the frame. Slide an opening pick into that gap and carefully work it toward the bottom right corner. Grab a second pick and do the same toward the bottom left. To prevent the adhesive from sealing back up, insert a third pick to keep the opening open as you continue the rest of the removal. If you need help, you can always schedule a repair.
Step 4


- Gently slide the opening pick in, just the tip for now, from the bottom left corner and move it along the edge to the top.
- Once you reach the top corner, leave the pick in place to keep that adhesive from making a comeback.
Step 5


Hold up! Don't swing the phone open just yet—the delicate fingerprint sensor cable is still holding hands between the back cover and the motherboard.
If the sticky stuff starts putting up a fight, hit it with more heat. The back cover is always under a bit of stress while you’re working, and if the adhesive isn’t soft enough, it could crack. Take it slow for a smooth ride.
- Gently slide the opening pick from the bottom right corner up along the side to the top. You're doing great!
- Now, take that opening pick and smoothly glide it around the corner to slice through the last bit of adhesive at the top of the phone. Almost there!
Step 6


- Gently lift up the side of the rear glass where the volume button hangs out—like you’re opening a secret door.
- Take your trusty spudger and carefully pop up the fingerprint sensor flex cable. Go slow, no rush—precision beats speed here!
Tools Used

Step 7

- Start by carefully removing the rear glass panel to get things started. When you're ready to put everything back together, follow this guide to reapply the adhesive and reattach the rear glass securely. If you're planning to swap out the rear glass altogether, make sure to transfer the rear camera bezel along with the fingerprint sensor to keep everything functioning smoothly. Need a hand? You can always schedule a repair with Salvation Repair for expert help.
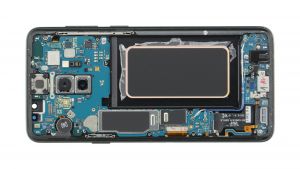
Step 8

The glue holding down the rear camera bezel is seriously tough stuff. If the iOpener isn’t cutting it, you can hit it with a hair dryer, heat gun, or hot plate to loosen things up. Just go easy—too much heat can turn your phone into a fancy paperweight.
- Set a warm, friendly vibe by placing a heated iOpener on the rear camera lens cover. Keep it there for at least two minutes to soften things up and make the next steps smoother. If you need a hand along the way, you can always schedule a repair.
Tools Used
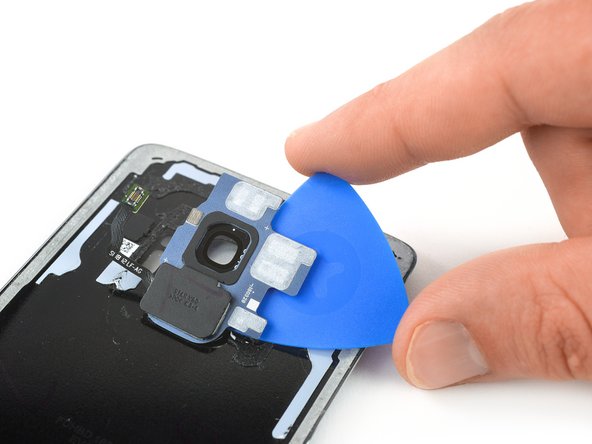
Step 9


If you're having trouble slipping an opening pick between the rear glass and the rear camera bezel, grab a playing card and give it a try to cut through the adhesive. It's a simple trick that might just do the job.
- Take an opening pick and gently slide it between the top edge of the bezel and the rear glass—like you're sneaking into a secret club.
- Work the pick around to slice through the sticky adhesive holding the upper part of the bezel. Go slow and steady—no need to rush the masterpiece!
Step 10

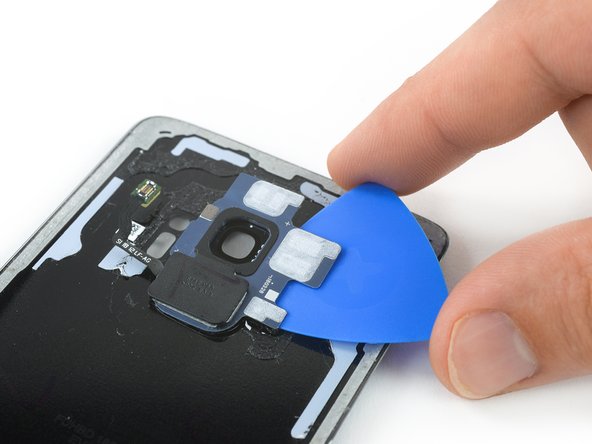
- Slide your opening pick under the right side of the rear camera bezel—think of it as sneaking into a club, but for phone parts.
- Glide the pick around the bezel to loosen up that stubborn adhesive. Take a victory lap with your tool!
- Give the pick a little twist to lift the rear camera bezel and fingerprint sensor. It should pop off like a lid on a fresh jar of salsa.
Step 11


- Stick on the new back cover using pre-cut adhesive or some trusty double-sided tape.
- Pop everything back together by reversing these steps—like hitting rewind, but for your device.
- Once you’ve got the rear cover in place, press down firmly for a few minutes to help that adhesive set. Heavy books come in handy here.
- Fire up your device and run through a quick check to make sure everything’s working. And hey, if you ever need a hand, you can always schedule a repair.