Apple Battery Replacement: 3 Simple Steps
Why Your iPhone’s Battery Health Matters More Than You Think
Apple battery replacement is a common repair that can save you time, money, and frustration. Here’s what you need to know:
Quick Answer: Getting Your Apple Battery Replaced
- Check – Review your battery health in Settings to confirm you need a replacement (typically when capacity drops below 80%).
- Choose – Select from three options: Official Apple service, independent repair shops, or DIY replacement.
- Prepare – Back up your data, disable Find My iPhone, and schedule your repair.
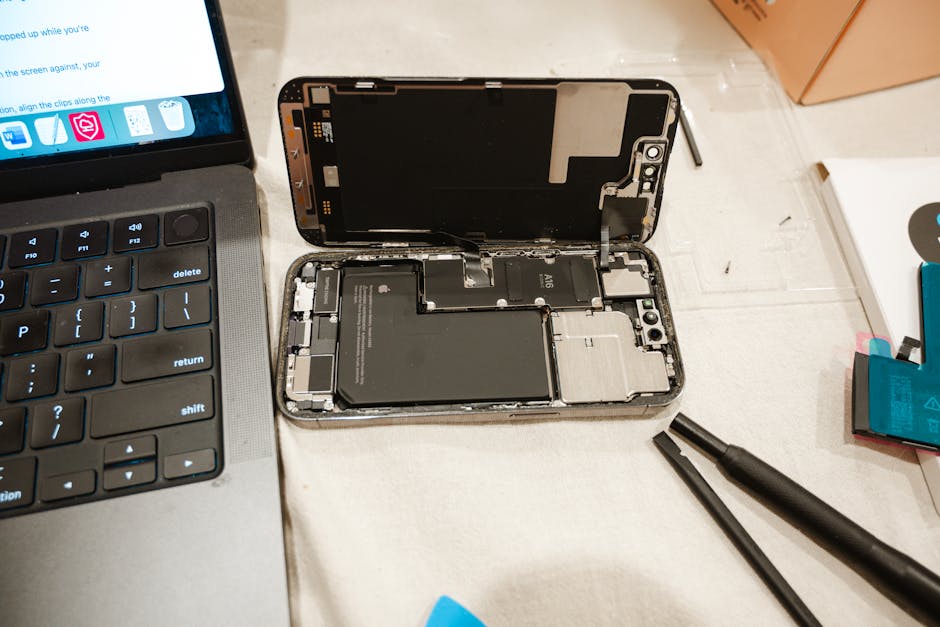
If your iPhone dies before lunch, takes forever to charge, or shuts down unexpectedly, you’re not alone. As iPhones age, their batteries degrade. The good news is that a simple battery replacement can often restore your phone to like-new performance.
Apple designs its batteries to last for a specific number of charge cycles before their capacity drops below 80%. For iPhone 14 and earlier, that’s 500 cycles; for iPhone 15, it’s 1000 cycles. Below 80%, you’ll notice significant performance issues.
You have three main paths: official Apple service (most expensive, genuine parts), independent repair shops like Salvation Repair (faster, more affordable), or DIY replacement (cheapest but risky). Each has trade-offs in cost, time, and warranty.
I’m Ralph Harris, an electronics repair specialist with 20 years of experience and over 500 Apple repair certifications. Apple battery replacement is one of the most common services I perform. In this guide, I’ll show you how to get your battery replaced quickly and affordably, ending your charging anxiety.
, Independent Shops ($50-$80, quality parts, same-day service), or DIY ($30-$60, requires tools and skill); Step 3 - Prepare for repair by backing up data to iCloud or computer, disabling Find My iPhone, and optionally removing SIM card for privacy - apple battery replacement infographic infographic-line-3-steps-elegant_beige")
Step 1: Check if You Need a Battery Replacement
Before scheduling an apple battery replacement, first confirm the battery is the problem. Sometimes a rogue app or software glitch is the real culprit, and a proper diagnosis can save you time and money.

When to Consider Replacing Your iPhone Battery
Key signs of a failing battery include:
- Unexpected shutdowns: Your phone dies suddenly, even with 30% or more charge remaining.
- Sluggish performance: Apps take longer to open and scrolling feels laggy. This is because iOS slows down phones with weak batteries to prevent shutdowns.
- Constant battery drain: You’re reaching for a charger multiple times a day.
- Physical bulging: In rare cases, a swollen battery can cause the screen or back of the phone to lift. If you see this, stop using the phone immediately and seek professional help.
The best way to check is built into your iPhone. Go to Settings > Battery > Battery Health & Charging.
Here you’ll see Maximum Capacity, which shows your battery’s health as a percentage. Below that, Peak Performance Capability tells you if the battery can still deliver full power. Apple recommends an apple battery replacement when the maximum capacity drops below 80%.
This 80% mark is typically reached after a certain number of charge cycles (using 100% of the battery’s capacity). iPhone 14 and earlier models are designed for 500 cycles, while the newer iPhone 15 models can handle 1000 cycles. You can learn more about how Apple designs their batteries on Apple’s battery technology page.
Is it the Battery or Something Else?
Not every power issue requires an apple battery replacement. Software issues, like a buggy app running in the background, can drain your battery quickly. Check Settings > Battery to see which apps are consuming the most power.
iOS updates can also temporarily affect battery life. Before seeking a repair, ensure your software is up to date by going to Settings > General > Software Update. Apple’s own diagnostics require the latest iOS version anyway.
If your iPhone won’t turn on at all or has other issues beyond battery drain, it could be a more serious problem. We handle these cases with our iPhone No Power Repair service. Our technicians in Laurel, MS, Jackson, MS, and Oxford, MS can diagnose whether it’s the battery, charging port, or logic board causing the issue.
Step 2: Explore Your Apple Battery Replacement Options
Once you’ve confirmed your battery needs replacing, you have three main options for an apple battery replacement, each with pros and cons regarding cost, convenience, and warranty.

Option 1: Official Apple Service
Going to Apple or an Apple Authorized Service Provider guarantees genuine Apple parts and service from trained technicians. The repair includes a 90-day service warranty. You can schedule an appointment at an Apple Store, use their mail-in service, or visit an authorized provider. To find the nearest location, you can check Apple’s website or call their support line. The main trade-offs are higher cost and potentially waiting several days for an appointment or mail-in turnaround.
Option 2: Independent Repair Shops
Local experts like us at Salvation Repair offer a balance of quality, speed, and affordability for apple battery replacement.
- Cost: Our pricing is typically more competitive than Apple’s out-of-warranty fees.
- Speed: We specialize in Phone Repair Same Day for most battery replacements, so you’re not without your phone for long.
- Quality: We use high-quality replacement parts and back every repair with a lifetime warranty on parts and labor. If our repair fails due to a defect, we’ll fix it at no charge.
We also offer price matching and have convenient locations in Laurel, MS, Jackson, MS, and Oxford, MS. As a shop that repairs “any device with a power button,” we have the experience to get the job done right.
Option 3: What to consider for a DIY apple battery replacement
For the technically adventurous, a DIY battery replacement might seem tempting. Online retailers sell kits with batteries, tools, and instructions.
The cost savings are real. DIY is the cheapest route, with kits often costing between $30 and $60. However, iPhones are intricate devices filled with tiny screws and delicate connectors. The risk of damage is significant. A small mistake can lead to a much more expensive repair. We’ve seen many DIY attempts go wrong, costing the owner more in the end.
Also, consider the time investment (often 1-2 hours) and the fact that a DIY repair will void any remaining Apple warranty. For most people, the money saved isn’t worth the risk and hassle. Professional service from a shop like Salvation Repair provides peace of mind, a warranty, and same-day service.
Step 3: Prepare for Your Repair Service
You’ve diagnosed your battery problem and picked your repair option. Now it’s time for the final step: getting your iPhone ready for its new battery. Taking a few minutes to prepare properly means protecting your data and ensuring a smooth repair experience.

Before You Go: Essential Prep
Back up your data first. This is the golden rule. While battery replacements are routine, technology can be unpredictable, and repair shops are not responsible for lost data. Your photos, messages, and apps are precious, so protect them.
- iCloud Backup: The easiest method. Connect to Wi-Fi, plug in your phone, and start the backup in Settings. Apple’s free 5GB of storage may not be enough, so you might need to temporarily upgrade your plan.
- Computer Backup: Connect your iPhone to a PC or Mac and use iTunes or Finder to create a full, local backup. This method has no storage limits.
Disable Find My iPhone before your appointment. Technicians need this security feature turned off to work on your device. You’ll need your Apple ID password to do this.
Removing your SIM card is optional but recommended for privacy. If you use an eSIM, you can skip this step. Professional technicians do not need access to your personal data to replace a battery and will respect your privacy.
What to Expect During the Service
When you arrive, a technician will run a diagnostics test to confirm the battery is the issue and check for other problems. If they find additional damage (like a cracked screen), Apple’s policy often requires fixing that first, adding to the cost. At Salvation Repair, we’re more flexible and will discuss all options with you, often offering combined repair discounts.
The repair time varies. At our locations in Laurel, MS, Jackson, MS, and Oxford, MS, we offer same-day service for most apple battery replacement jobs, typically taking 30-60 minutes.
After the repair, the technician performs post-repair testing to ensure everything works correctly. Your old battery will be handled through responsible battery recycling. When you come to us for Battery Repair, you can be sure the old components are disposed of safely.
Battery Service for Other Apple Devices
Your iPhone isn’t the only Apple device that might need a battery boost. Whether you’re tapping away on an iPad, typing on a MacBook, checking your Apple Watch, or dusting off an old iPod, all these devices eventually face the same reality: batteries wear out.
The good news? The same principles we’ve discussed for iPhone batteries apply across Apple’s entire product lineup. The not-so-good news? Each device has its own quirks, costs, and considerations when it comes to apple battery replacement.

iPad and MacBook Battery Service
We see a lot of iPads and MacBooks at our Laurel, MS, Jackson, MS, and Oxford, MS locations, often from customers who’ve noticed their devices aren’t lasting as long between charges as they used to.
iPad batteries are built to last, designed to retain 80% of their original capacity at 1000 complete charge cycles. That’s the same impressive longevity as the newer iPhone 15 models. If you’re using your iPad daily for work, school, or entertainment, you might reach that threshold after a couple of years of heavy use.
MacBook batteries follow the same 1000-cycle design standard, whether you’re using a MacBook, MacBook Air, or MacBook Pro. Apple’s one-year warranty includes replacement coverage if your battery is defective, but once you’re past that year and your battery health drops below 80%, you’ll likely notice shorter battery life and possibly performance throttling.
Here’s where things get a bit more complicated (and expensive): apple battery replacement for iPads and MacBooks typically costs more than iPhone service. For MacBooks especially, the battery is often integrated into the top case assembly, which includes the keyboard and trackpad. This means replacing the battery sometimes requires replacing that entire assembly, driving up both parts and labor costs significantly.
The complexity of these repairs also means they require specialized tools and expertise. At Salvation Repair, we handle these more intricate repairs with the same care and precision we bring to every device. If your iPad is showing signs of battery fatigue, our iPad Battery Replacement service can restore it to full functionality. For any other iPad issues you might encounter, we offer comprehensive iPad Repair options as well.
Apple Watch and iPod Battery Service
Even Apple’s smallest devices need battery love from time to time. Your Apple Watch might be tiny, but its battery is a technological marvel, designed to retain 80% of its original capacity at 1000 complete charge cycles. That’s impressive for something that sits on your wrist all day, tracking your steps, monitoring your heart rate, and delivering notifications.
If you’ve still got an iPod tucked away (remember those?), its battery was designed for 80% capacity retention at 400 complete charge cycles. That’s fewer cycles than modern devices, reflecting older battery technology.
The warranty terms vary slightly across these smaller devices. While most Apple products come with a one-year warranty covering manufacturing defects, the Apple Watch Edition specifically includes a two-year warranty for defective batteries. That’s a nice perk if you invested in one of those premium models.
Because of their compact, sealed designs, battery service for Apple Watches and iPods can be tricky. Sometimes it’s more practical to replace the entire unit rather than attempting to swap just the battery. This is especially true for older models where opening the device risks damaging other delicate components.
No matter which Apple device is giving you battery grief, whether it’s an iPad that dies halfway through your Netflix binge, a MacBook that barely makes it through a meeting, or an Apple Watch that needs charging twice a day, we’re equipped to help. Our technicians across our Laurel, MS, Jackson, MS, and Oxford, MS locations have the tools and expertise to diagnose and repair batteries in virtually any Apple device. After all, we repair “any device with a power button,” and that definitely includes your entire Apple ecosystem.
Frequently Asked Questions about Apple Battery Replacement
We get a lot of questions about apple battery replacement. Here are answers to some of the most common inquiries we hear at our Laurel, MS, Jackson, MS, and Oxford, MS locations.
How much does an apple battery replacement cost?
The cost varies by model and service provider.
- Apple Service: Out-of-warranty replacements at Apple typically cost between $69 to $99 for an iPhone. iPads and MacBooks cost more.
- AppleCare+: If you have AppleCare+ and your battery’s capacity is below 80%, the replacement is free.
- Salvation Repair: Our prices are often more affordable than Apple’s fees, and we back every repair with a lifetime warranty. Check our Pricing page or call for a specific quote.
- DIY Kits: Kits from online retailers average around $30-$60. This is the lowest upfront cost but comes with the risk of damaging your device and no professional warranty.
What is the role of AppleCare+ and Apple’s Warranty?
Understanding your coverage is key.
Apple’s standard one-year Limited Warranty covers manufacturing defects but does not cover batteries that wear down from normal use.
AppleCare+ is an extended service plan. If you have it and your battery capacity is below 80%, you are eligible for a battery replacement at no additional cost. You can check your coverage status on Apple’s website using your device’s serial number.
What if my iPhone has other damage, like a cracked screen?
This is a common situation. If you go to Apple with a cracked screen, they will likely require you to fix the screen first, which means additional costs on top of the battery fee.
At Salvation Repair, we are often more flexible. We can assess all the damage and discuss the most cost-effective solution with you. We also offer combined repair discounts if you need to fix multiple issues at once, like an apple battery replacement and a screen repair. Since we fix “any device with a power button,” we’re prepared for any combination of issues.
Conclusion
Getting an apple battery replacement is simple when you follow three steps: Check, Choose, and Prepare. By doing so, you can confidently restore your iPhone’s power and performance.
A fresh battery breathes new life into your device. Customers are often amazed at how much better their iPhone performs afterward—apps open faster, the phone lasts all day, and unexpected shutdowns are a thing of the past. It’s like getting a new phone at a fraction of the cost.
Battery replacement is remarkably cost-effective compared to buying a new phone. If your iPhone is otherwise in good shape, a simple battery swap can solve your problems for a fraction of the cost of a new device.
Whether you choose official Apple service, a DIY project, or an independent shop, the key is making an informed decision that fits your needs and budget.
For those who want fast, reliable service with a lifetime warranty and competitive pricing, we’d love to help you at Salvation Repair. Our technicians in Laurel, MS, Jackson, MS, and Oxford, MS specialize in same-day repairs. We stand behind our work and will match competitor pricing to ensure you get the best deal.
Ready to give your iPhone the power boost it deserves? Schedule Repair with us today, and let’s get your device back to full strength!
6 thoughts on “How to Get Apple Battery Replacement in 3 Simple Steps”
Comments are closed.