Laptop Repair 101: Simple Fixes
Why Laptop Repair Is Easier Than You Think
Laptop repair might seem intimidating, but most common issues are surprisingly fixable – even if you’ve never picked up a screwdriver. Whether your laptop won’t turn on, runs slowly, or has a cracked screen, understanding the basics can save you hundreds of dollars and get you back to work faster.
Quick Laptop Repair Guide:
- Won’t turn on – Check power adapter, listen for beep codes, test with external monitor
- Overheating – Clean vents with compressed air, check CPU temperature
- Slow performance – Upgrade to SSD, add more RAM, remove dust buildup
- Screen issues – Test with flashlight for backlight problems, check for loose connections
- Battery problems – Monitor battery health, look for case swelling, consider replacement
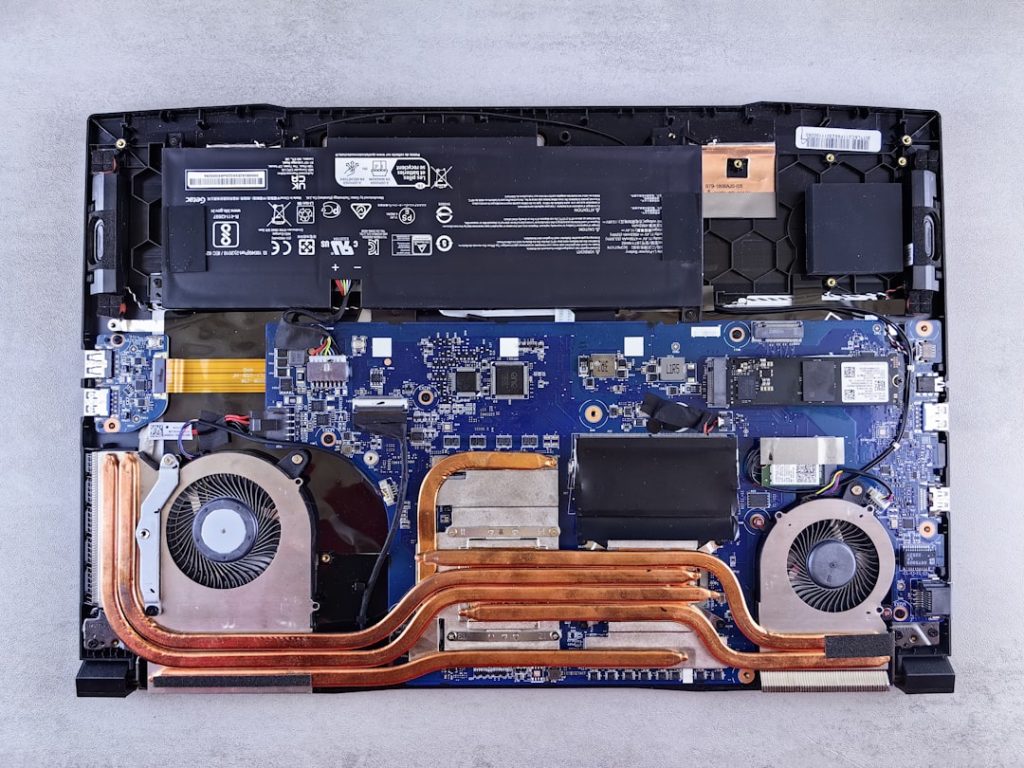
The most commonly replaced laptop parts are the battery, screen, motherboard, and fans according to repair data. Many of these repairs don’t require advanced technical skills – just patience and the right approach.
Before diving into complex repairs, always start with simple troubleshooting. A laptop that won’t boot might just need a proper power adapter or RAM reseating. Even Dell’s automated repair service reports that display issues, power problems, and hard drive failures make up the majority of repair requests.
I’m Ralph Harris, and over my 20 years in electronics repair, I’ve seen thousands of laptop repair cases that customers thought were hopeless but turned out to be simple fixes. My experience with over 2000+ repair guides has shown me that most people can handle basic laptop repair with the right guidance and approach.
, screen damage (20%), overheating from dust (18%), storage drive failure (15%), RAM issues (12%), and power adapter problems (10%) - laptop repair infographic")
Identifying the Problem: What’s Wrong With Your Laptop?
Think of yourself as a detective gathering clues – before we can fix your laptop, we need to figure out exactly what’s going wrong. The good news? Most laptop repair issues follow predictable patterns, and once you know what to look for, the mystery starts to solve.
Your laptop might be telling you something’s wrong through slow performance that makes simple tasks feel like watching paint dry, power issues where it won’t turn on or randomly shuts off, overheating that could fry an egg on the keyboard, screen problems that make everything look like abstract art, or strange noises that sound like a dying robot.
Here’s what I’ve learned from years of repairs: the battery, screen, motherboard, and fans are the usual suspects. These components fail more often than others, so they’re great starting points for our investigation.
Before we dive deeper, we need to identify your exact laptop model. This isn’t just helpful – it’s absolutely crucial for finding the right parts or repair guides. Flip your laptop over and look for a sticker on the bottom or inside the battery compartment. You’ll find the manufacturer name, model number, and often something called a Service Tag or Serial number. Think of this as your laptop’s fingerprint – it’s unique to your device and open ups specific repair information.

Your laptop’s design also affects how we approach repairs. Most laptops use the traditional clamshell design – you know, the classic laptop look with a screen that flips up from the keyboard. But you might have a 2-in-1 convertible that bends all the way around to become a tablet, or a detachable where the screen completely separates from the keyboard base.
Why does this matter? Well, some ultra-thin models have components soldered directly to the motherboard, making DIY repairs about as easy as performing surgery with oven mitts. Others open up like a book, practically begging you to tinker inside.
Is It a Hardware or Software Issue?
Here’s where we separate the wheat from the chaff. Is your problem physical (hardware) or digital (software)? Getting this right saves you from trying to fix a broken screen with antivirus software or replacing a perfectly good hard drive when you just need to reinstall Windows.
Hardware problems usually announce themselves pretty clearly. Your laptop might receive no power at all, make strange beep codes during startup that sound like electronic Morse code, show physical damage like a cracked screen or broken hinge, or have components that simply don’t respond – like a keyboard that’s taken a permanent vacation.
Software problems are trickier but have their own calling cards. Windows users know the dreaded Blue Screen of Death, while everyone can recognize when the operating system won’t load or keeps crashing like a bad driver. Sometimes specific applications freeze or throw error messages that make about as much sense as ancient hieroglyphics.
If your laptop turns on but refuses to boot properly, don’t panic. Windows users can try the troubleshooting steps in this helpful guide: What to do when Windows doesn’t start. Linux users facing boot issues might find salvation here: Fixing a Linux system that won’t boot.
Common Signs of Failing Components
Let me walk you through the most common component failures I see in laptop repair. Each part has its own way of crying for help.
Failing batteries are probably the most common complaint. Your once-reliable laptop might suddenly have poor battery life, lasting about as long as a snowball in summer even after a full charge. Sometimes it won’t charge at all, or charges slower than molasses in January. The most alarming sign? Case swelling – if your laptop looks like it’s pregnant, that’s the battery expanding and it needs immediate attention for safety reasons.
Failing fans make themselves known through sound and fury. You might hear loud grinding noises that sound like a coffee grinder having a breakdown, or notice your laptop getting hot enough to cook breakfast on. Sometimes the fan stops spinning entirely, causing overheating so severe that your laptop shuts itself down when the CPU hits around 100°C – basically its own built-in fire prevention system.
Failing storage drives have different symptoms depending on their type. Traditional hard drives (HDDs) make clicking sounds when they’re dying – we call it the “click of death” in the repair business. Both HDDs and SSDs can cause slow file access that makes opening a simple document feel like an eternity, system freezes that leave you staring at a frozen screen, or complete boot failures.
Failing screens offer a whole spectrum of visual problems. You might see dead pixels – those annoying little dots stuck on one color that look like tiny screen pimples. Other signs include flickering displays, mysterious lines across the screen, or no backlight where you can barely see a faint image if you shine a flashlight on it.
The key is learning to listen to what your laptop is telling you. These symptoms are like a foreign language at first, but once you understand the basics, your laptop’s problems become much clearer.
DIY Troubleshooting: Simple Fixes You Can Try at Home
Ready to become your own laptop repair hero? Most laptop problems have surprisingly simple solutions, and with a little patience and the right approach, you can save yourself a trip to the repair shop. Think of this as your detective work – we’ll start with the obvious culprits and work our way up to the trickier suspects.
Safety comes first, always. Before you touch anything inside your laptop, disconnect it from power completely. Remove the battery if possible, and ground yourself by touching a metal object to discharge any static electricity. Those tiny components inside are more delicate than they look, and static can fry them faster than you can say “oops.”
The secret to successful troubleshooting? Follow a systematic approach. Start with the simplest, most obvious fixes first. You’d be amazed how many “broken” laptops just needed their power adapter wiggled back into place properly.

The “Won’t Turn On” Checklist
A dead laptop can feel like a crisis, but don’t panic just yet. Most “won’t turn on” cases have straightforward explanations. Let’s walk through this step by step, like following breadcrumbs back to a working laptop.
Check that power adapter first. Is it plugged in securely to both the wall and your laptop? Make sure you’re using the correct adapter – using the wrong wattage can prevent charging or even damage your device. Look for the wattage rating on both your laptop and the adapter to ensure they match. If you’ve been using a borrowed charger, this might be your culprit right here.
Give your laptop some time after plugging it in before trying to turn it on. Sometimes a completely drained battery needs a few minutes to accept enough charge to boot up.
Listen carefully for beep codes. Your laptop might be trying to tell you exactly what’s wrong through a series of beeps during startup. These aren’t random – they’re actually diagnostic codes. For example, two beeps on many laptops typically signal a RAM issue, while continuous beeping might indicate a motherboard problem. Check your laptop manufacturer’s website to decode what those beeps mean for your specific model.
Test the display with the flashlight trick. Sometimes your laptop is actually running fine, but the screen appears completely black. Shine a bright flashlight directly at the screen in a dark room and look very closely. Can you faintly make out images, windows, or text? If yes, your backlight has failed, but the actual screen is working. This is often a more affordable fix than replacing the entire display.
Try accessing the BIOS. The BIOS is your laptop’s fundamental firmware that runs before your operating system loads. Press F2, F10, or Delete repeatedly right after hitting the power button to enter BIOS setup. If you can access BIOS, congratulations – your hardware is mostly functional, and you likely have a software problem rather than a hardware failure.
Tackling Overheating and Performance Issues
Heat is electronics’ worst enemy, and laptops pack a lot of power into tight spaces. When your laptop starts running hot, it’s like having a fever – everything slows down to protect itself from damage.
Understanding heat thresholds helps you know when to worry. Your CPU will automatically shut down your laptop when it hits around 100°C (212°F) to prevent permanent damage. While some warmth is normal during heavy use, if your laptop is too hot to keep on your lap during light tasks, something’s wrong.
You can monitor your CPU temperature using free software to get actual numbers instead of guessing. This helps you track whether your cleaning efforts are actually working.
Cleaning vents and fans is the most effective laptop repair you can do for overheating. Dust acts like a blanket, trapping heat inside your laptop. Use compressed air to blow dust out of the vents, but be gentle – don’t spin the fan too fast with the air blast, as this can damage the bearings.
Work in short bursts and hold the fan still if you can see it. You’ll be shocked at how much dust comes out of a laptop that seemed clean from the outside. It’s like a dust bunny explosion.
Storage drive upgrades can transform a sluggish laptop into a speed demon. Traditional HDDs with their spinning parts are the main performance bottleneck in older laptops. They’re mechanical, slower, and more fragile than modern storage options.
Upgrading to an SSD (Solid State Drive) is often the single most impactful laptop repair upgrade you can make. SSDs have no moving parts, boot your laptop faster, load programs quicker, and use less battery power. It’s like giving your laptop a completely new engine.
RAM upgrades help when you’re running multiple programs simultaneously. More RAM means your laptop can juggle more tasks without slowing down. The good news? If your RAM slots are accessible (not soldered to the motherboard), this is usually a straightforward upgrade that doesn’t require advanced technical skills.
Before buying new RAM, check how much you currently have and whether adding more will actually help your specific usage patterns. Sometimes the performance boost is dramatic, other times it’s barely noticeable.
When to Seek Professional Laptop Repair
Sometimes the best laptop repair decision is knowing when to step back and call in the experts. While DIY troubleshooting can solve many issues, certain repairs require specialized skills and equipment that most of us simply don’t have at home.
Complex repairs like motherboard soldering are a perfect example. When tiny components need to be removed and replaced with precision soldering equipment, it’s definitely time to seek professional help. The same goes for intricate power delivery system repairs or replacing components that require specialized tools you’d only use once.
Lack of proper tools is another clear sign you need professional assistance. Some laptop repairs require specific screwdriver bits, spudgers, or even microscopes for detailed work. Buying all these tools for a single repair often costs more than the repair itself.
The cost-benefit analysis is crucial here. If the repair estimate approaches 50% or more of what you’d pay for a comparable new laptop, replacement might make more sense financially. This is especially true for older laptops where multiple components might be failing.
Diagnostic service costs vary widely in the repair industry. Some shops charge around $20 for diagnostics, while others might charge upwards of $150. The good news is that many shops apply the diagnostic fee toward your repair cost if you decide to proceed.
How to Check Your Warranty
Before spending a dime on repairs, always check your warranty status first. You might be surprised to find your laptop is still covered, especially if it’s relatively new.
Finding your serial number is the first step. Look for a sticker on the underside of your laptop or check inside the battery compartment. You can also find it in your BIOS settings or Windows system information.
Most manufacturer warranties cover manufacturing defects but not accidental damage like drops, spills, or physical impacts. Extended warranties or accidental damage protection plans are separate purchases that provide broader coverage.
Here are the main manufacturer warranty check pages you’ll need:
Simply enter your serial number or service tag, and you’ll instantly see your coverage status and expiration date.
Preparing Your Device for a Professional Laptop Repair
Getting your laptop ready for professional repair is just as important as choosing the right repair service. Taking these steps protects both your data and your privacy.
Data backup is absolutely the most critical step – I can’t stress this enough. Professional repairs sometimes require wiping the hard drive or reinstalling the operating system. Cloud backup services like Google Drive or OneDrive are convenient, but don’t rely on them alone. Use an external drive for a complete backup of everything important.
Protecting your privacy means more than just backing up files. Log out of all your accounts – email, social media, banking apps, everything. If possible, create a temporary user account for the repair technician to use, or better yet, remove personal data entirely from the device.
When it comes to what to send for repair, keep it simple. Send your laptop and AC adapter only. Remove all other accessories like USB drives, SD cards, external mice, or CDs. These items can easily get misplaced during repair, and they’re not needed for most laptop repair work anyway.

Taking these preparation steps seriously can save you from heartbreak later. I’ve seen too many customers lose precious family photos or important work documents because they skipped the backup step. Don’t let that be you.
Frequently Asked Questions about Laptop Repair
What are the most commonly replaced laptop parts?
If you’re wondering what breaks most often in laptops, you’re not alone! The battery tops the list because it’s essentially a consumable part that degrades with every charge cycle. After a few years, even the best laptop battery will hold less charge and eventually need replacement.
Screen damage comes in second, and it’s usually the result of accidents – dropping the laptop, closing it with something on the keyboard, or applying too much pressure. The good news is that screens can often be replaced without affecting your data.
The motherboard is the most expensive component to replace, but thankfully failures are less common. When they do happen, it’s often due to power surges, liquid damage, or component wear over time. Fans also wear out frequently, especially in dusty environments, leading to overheating issues.
Other parts we see regularly include keyboards (keys stop working or get damaged), charging ports (from wear and tear), and RAM modules (though these are often upgradeable rather than just replaceable).
How long does a typical laptop repair take?
The honest answer is “it depends,” but I can give you some realistic expectations. Simple repairs like battery replacement or cleaning dust from fans can often be completed the same day if parts are available. At Salvation Repair, we specialize in same-day service whenever possible.
More complex issues take longer. If your motherboard needs repair or replacement, you’re looking at several days, especially if we need to order specific parts for your laptop model. Screen replacements usually take 1-2 days once we have the correct screen in stock.
The biggest variable is parts availability. Common laptop models have readily available parts, but if you have an older or less common model, we might need to source parts from specialized suppliers. We always give you an honest time estimate upfront and keep you updated throughout the process.
Is it cheaper to repair a laptop or buy a new one?
This is probably the question I get asked most, and it’s a smart one to consider! The 50% rule is a good starting point – if the repair costs more than half the price of a comparable new laptop, replacement might make more sense financially.
But there’s more to consider than just dollars. A laptop repair for a high-quality business laptop that’s only two years old almost always makes sense, even if it costs $300-400. That same repair cost on a budget laptop that’s five years old? Probably time to shop for something new.
Battery replacements and screen fixes are usually worth it because they’re relatively affordable compared to buying new. Motherboard replacements are trickier – they’re expensive, but if your laptop has great specs and is otherwise in good shape, it might still be worthwhile.
Don’t forget about the hassle factor either. Repairing means keeping all your familiar software, settings, and data exactly where you left them. Sometimes that convenience is worth the cost, even if the math is close.
Conclusion: Your Guide to Smart Laptop Care and Repair
You’ve now got the tools and knowledge to tackle most laptop repair challenges that come your way. The key is remembering our simple approach: diagnose first, try the easy fixes, and don’t be afraid to call in help when you need it.
Think of this guide as your laptop’s best friend. When something goes wrong, you’ll know whether it’s a quick compressed air cleaning or time for professional attention. Most importantly, you’ll save money by avoiding unnecessary repairs and catching problems early.
Prevention beats repair every time. Keep your laptop clean – especially those air vents that love collecting dust bunnies. Update your software regularly to keep everything running smoothly and securely. Handle your device with care, because gravity is not your laptop’s friend.
Regular maintenance is like giving your laptop a spa day. A little attention goes a long way toward preventing those frustrating breakdowns that always seem to happen at the worst possible moment.
When DIY troubleshooting reaches its limits, that’s where professional laptop repair makes sense. At Salvation Repair, we understand how important your laptop is to your daily life. Whether you’re dealing with a mysterious power issue, overheating problems, or screen damage, our team specializes in getting your device back to perfect working order.
We’re proud to serve the Laurel, MS, Jackson, MS, and Oxford, MS areas with same-day, on-site repairs. Our lifetime warranty means you can trust that your repair will last, and our price matching guarantee ensures you’re getting fair value. We repair “any device with a power button” – so your laptop is definitely in our wheelhouse.
The best part? You don’t have to be without your laptop for days or weeks. Our on-site service brings the repair shop to you, getting you back to work, school, or entertainment as quickly as possible.
Ready to dive deeper into laptop care? We’ve got plenty more wisdom to share.