The Ultimate iPhone 16 Pro Screen Replacement and Kit Guide
What You Need to Know Before Getting an iPhone 16 Pro Screen Replacement
An iphone 16 pro screen replacement is one of the most common repairs people need — and one of the most confusing to shop for. Prices vary, quality levels differ, and one wrong choice can permanently disable features like Face ID or True Tone.
Here’s a quick breakdown of your main options:
| Screen Type | Quality Level | Approximate Cost (Parts Only) |
|---|---|---|
| AQ7 LCD (Aftermarket) | Basic | $149.95 |
| Aftermarket OLED (Soft) | Mid to Good | $179.95 – $199.95 |
| OEM | Best | $369.95 |
The fastest answer: If you want the best result with no feature loss, go with an OEM screen installed by a professional. If budget is tight, a soft aftermarket OLED is the next best step. Avoid LCD if display quality matters to you.
A few more quick facts before you dive in:
- True Tone and auto-brightness are disabled on aftermarket LCD screens due to Apple’s parts pairing system
- Screen repairs at a professional shop typically take 10–15 minutes and are done right in front of you
- Water resistance is only restored if proper replacement adhesive is applied correctly
- DIY repair is possible but carries real risks — including battery puncture and permanent Face ID damage
I’m Ralph Harris, owner of Salvation Repair in Laurel, MS, with over 20 years of electronics repair experience and more than 500 Apple repair certifications — including hands-on iPhone 16 Pro screen replacement work. In this guide, I’ll walk you through every option so you can make the smartest choice for your situation.
Choosing Your iPhone 16 Pro Screen Replacement: LCD vs. OLED vs. OEM
When your screen shatters, your first instinct might be to find the cheapest repair possible. However, the technology behind the iPhone 16 Pro’s Super Retina XDR display is highly sophisticated. Cutting corners on the replacement part can fundamentally change how your phone looks, feels, and performs.
To help you navigate these choices, we have put together a breakdown of the three primary tiers of replacement screens. For a deeper dive into the repair journey, you can also explore our guide on From Cracked to Pristine: Navigating Your iPhone 16 Screen Repair Journey.
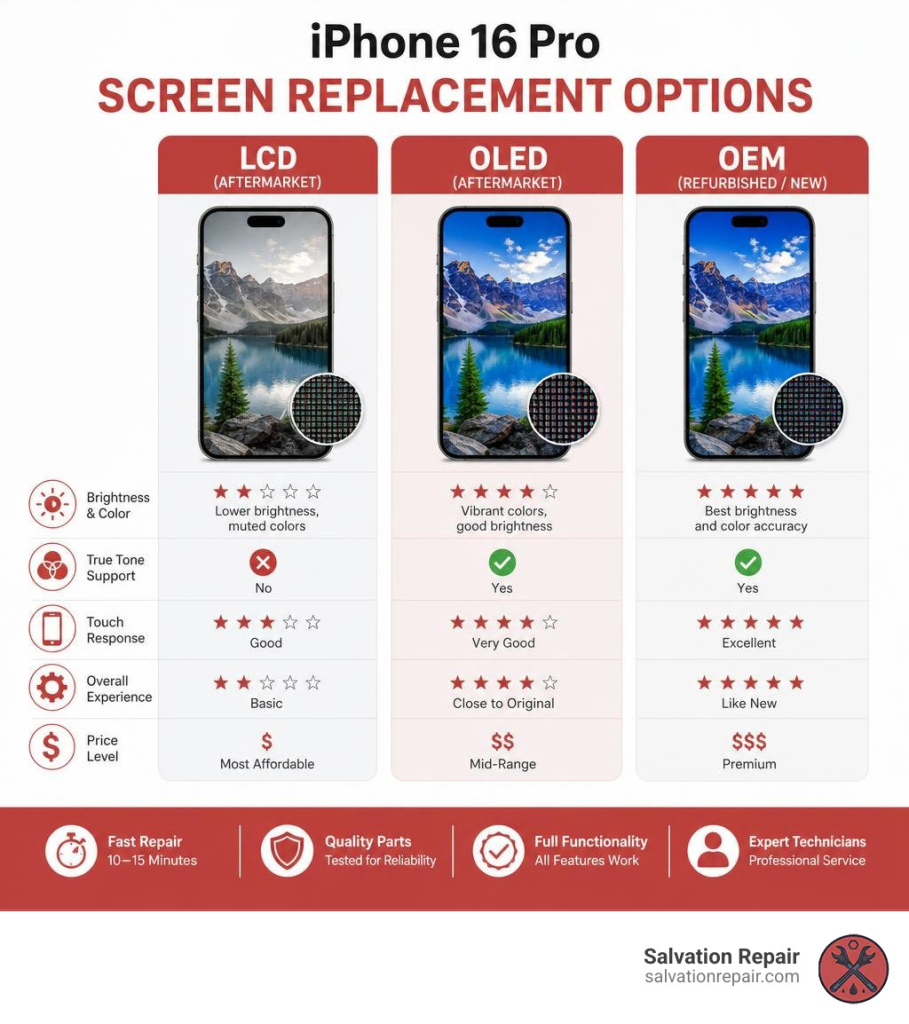
LCD Screen Options (AQ7 LCD)
Let’s start with the absolute budget tier: the AQ7 In-Cell LCD.
The iPhone 16 Pro natively uses an OLED display. OLEDs illuminate every single pixel individually, which is why you get those deep, true blacks and vibrant contrast. An LCD, on the other hand, relies on a global backlight. This means “black” areas of your screen will actually look dark gray because the backlight is still shining through.
If you opt for an AQ7 LCD screen:
- Lower Resolution & Brightness: These screens are noticeably darker (often under 500 cd/m²) and have lower resolution than the original.
- In-Cell Technology: While “In-Cell” means the touch digitizer is integrated directly into the display layer (making it thinner than older LCDs), it still cannot replicate OLED performance.
- True Tone & Auto-Brightness Loss: Because of Apple’s strict parts pairing restrictions, installing an aftermarket LCD will disable True Tone and auto-brightness entirely.
- Higher Battery Consumption: Because an LCD requires a constant backlight to be turned on, it will drain your battery faster than an OLED.
We consider LCDs to be a lower-tier, temporary alternative. It is a functional option if you just need to recover data or if you are on an extremely tight budget, but it will not deliver the premium iPhone experience you are used to.
Aftermarket OLED Screen Options (Hard vs. Soft)
If you want to save some cash but still want your display to look like an iPhone screen, aftermarket OLEDs are the middle-ground sweet spot. These are generally divided into two categories: Hard OLED and Soft OLED.
- Hard OLED: Built on a rigid glass substrate, these are cheaper to manufacture. They offer great color accuracy and brightness, but because the panel is rigid, they have slightly thicker bezels. More importantly, they are much more fragile. A minor drop that wouldn’t normally crack your outer glass could shatter the internal Hard OLED matrix, rendering the screen instantly black.
- Soft OLED: Built on a flexible plastic substrate (just like Apple’s original screens), Soft OLEDs are highly durable. They mimic the original bezel size perfectly, handle drops much better, and support a smooth 120Hz refresh rate.
Choosing a premium Soft OLED balances cost and performance beautifully. While you might still run into parts-pairing notifications depending on your iOS version, the physical quality of the display is incredibly close to what came out of the box.
OEM Screen Options (Refurbished vs. New OEM)
For those who accept nothing less than perfection, genuine OEM (Original Equipment Manufacturer) screens are the gold standard.
- OEM Refurbished: These are original Apple OLED panels that had cracked outer glass. Specialized refurbishing facilities separate the broken glass and laminate a fresh, high-quality glass digitizer onto the original OLED panel. You get 100% original display quality, perfect colors, and original power efficiency at a slightly lower price point.
- New OEM (Service Packs): These are brand-new, genuine screens sourced directly from Apple’s supply chain.
- Assembled OEM (OEM Chips only): These are Basically the same hardware as the Soft OLED, but uses OEM chips so the phone “says” it’s an “original” Part. On the iPhone 16 Pro these are good options at only $179.95 (including labor).
When you install a genuine OEM screen, you can use Apple’s built-in Repair Assistant (available in Settings > General > About > Parts & Service History) to calibrate the display. This officially pairs the new screen to your logic board, fully restoring True Tone, auto-brightness, and removing any “Unknown Part” warnings. For official details on Apple’s repair support, you can review the Apple Service and Repair for iPhone Screens page.
The Real Cost of iPhone 16 Pro Screen Repairs in 2026

Let’s talk numbers. Screen repair pricing in June 2026 is highly dependent on whether you go through Apple, an authorized independent shop like us, or attempt to buy parts wholesale. To get a broader look at the market, check out our analysis on How Much iPhone 16 Screen Repair 2026.
Professional iPhone 16 Pro Screen Replacement Cost and Options
If you walk into an Apple Store without AppleCare+, you will face a premium out-of-warranty screen repair fee, with exact pricing confirmed only after their technicians inspect your device for secondary damage.
At Salvation Repair, we believe in transparent, competitive pricing. For the standard iPhone 16 Pro, our screen repairs are quoted at $129.95 for standard LCD, $129.95 for aftermarket OLED, and $149.95 for OEM.
To give you an idea of the pricing scale for the larger iPhone 16 Pro Max, here is how those rates break down:
- AQ7 LCD: $129.95
- Aftermarket OLED: $219.95
- OEM Refurbished: $399.95
- New OEM: $469.95
When you choose professional installation at Salvation Repair, you aren’t just paying for the part. You are paying for precision calibration, the restoration of water-resistant seals, and the peace of mind that comes with our lifetime warranty and price-matching guarantee. For more general context on what goes into these rates, check out our guide on iPhone Screen Repair Cost.
Why DIY Kits Aren’t Worth the Risk: Cost vs. Value
Many people see a screen online for $90 and think, “I can easily do that myself and save a hundred bucks!” But retail DIY screen kits hide a lot of extra costs.
To perform a safe, clean iphone 16 pro screen replacement, you cannot just use a butter knife and a standard household screwdriver. You will need:
- Precision P2 pentalobe and Y000 tri-point screwdrivers
- A specialized heating pad or iOpener to soften the industrial frame adhesive
- Heavy-duty suction clamps and ultra-thin opening picks
- High-concentration (>90%) isopropyl alcohol for cleaning frame residue
- Replacement water-resistance adhesive cuts
By the time you purchase a high-quality aftermarket screen and all the specialized tools required to install it without destroying your phone, your total investment often meets or exceeds the cost of bringing it to Salvation Repair. To see how this pattern plays out across older generations, you can read about The True Cost of Repairing an iPhone 14 Screen.
Step-by-Step DIY Repair Guide and Key Risks

If you are an experienced tech hobbyist and still want to tackle this repair on your own, we want to make sure you do it as safely as possible. Before turning a single screw, we highly recommend reading the official iPhone 16 Pro Repair Manual – Apple Support.
DIY iPhone 16 Pro Screen Replacement: Tools and Risks
Replacing the screen on the iPhone 16 Pro is a complex process. Unlike older iPhone models, you have to be incredibly precise to avoid damaging delicate internal ribbon cables. For a complete visual layout of this process, you can refer to the iPhone 16 Pro Screen Replacement – iFixit Repair Guide.
Here is a high-level summary of the physical steps required:
- Preparation: Power down your phone. If your screen is severely shattered, apply packing tape over the glass to prevent shards from breaking off. Drain your battery below 25% to minimize thermal risks.
- Remove Screws: Remove the two 7.4 mm pentalobe screws on either side of the USB-C charging port.
- Apply Heat: Apply heat to the bottom edge of the phone to soften the perimeter adhesive.
- Create a Gap: Secure a suction handle to the lower half of the screen and pull upward gently to create a microscopic gap between the display and the titanium frame.
- Slice the Adhesive: Insert an opening pick. CRITICAL WARNING: Do not insert the pick deeper than 3 mm along any edge. Doing so will slice the display ribbon cable or damage internal grounding clips.
- Swing Open the Screen: Carefully swing the screen open from the right side (like opening a book).
- Disconnect the Screen: Remove the metal connector covers secured by 1.3 mm tri-point screws, then gently pop off the press connectors. Note: On the iPhone 16 Pro, you cannot disconnect the battery during a screen-only repair, meaning you must be exceptionally careful not to touch metal tools to exposed board contacts.
- Transfer the Ambient Light Sensor: If your replacement screen does not come with a pre-installed sensor, you must carefully heat, pry, and transfer the delicate ambient light sensor assembly from your old screen to the new one.
- Reapply Adhesive & Reassemble: Clean the frame thoroughly with isopropyl alcohol, lay down fresh water-resistance adhesive, reconnect the cables, reinstall the covers, and press the screen back into place.
Critical Risks of DIY Screen Repairs
While the steps above might sound straightforward, the margin for error is razor-thin.
- Battery Puncture Hazards: Because the battery remains connected and sits directly adjacent to your prying tools, a single slip with a metal tool can puncture the lithium-ion cell, causing a thermal runaway event (a battery fire).
- Permanent Face ID Damage: The front camera and Face ID sensor array are exceptionally fragile. Slicing a nearby cable or scratching the sensor during the ambient light sensor transfer will permanently disable Face ID. If you suspect your camera array is already compromised, you may need to consult the iPhone 16 Pro Front Camera Assembly Replacement – iFixit Repair Guide.
- Loss of Water Resistance: Restoring the IP68 water resistance requires clinical cleanliness. If even a tiny speck of old adhesive residue remains on the titanium frame, the new adhesive seal will fail, leaving your phone vulnerable to liquid damage.
- The “Unknown Part” Warning: Without specialized calibration tools or access to Apple’s Repair Assistant, a DIY screen replacement will trigger a persistent “Unknown Part” notification in your iOS settings, and features like True Tone will remain locked out.
Frequently Asked Questions about iPhone 16 Pro Screen Repairs
Will replacing my iPhone 16 Pro screen disable Face ID or True Tone?
If you perform a DIY repair or use a low-quality third-party shop that lacks proper calibration software, yes — True Tone and auto-brightness will be disabled. Face ID can also be permanently disabled if the front sensor assembly is damaged during the transfer process.
At Salvation Repair, we use professional calibration tools and genuine parts to ensure that your phone’s logic board properly pairs with the new screen. This preserves your Face ID and restores full True Tone functionality seamlessly.
How does a screen replacement affect my iPhone’s water resistance?
The iPhone 16 Pro features an IP68 water resistance rating out of the box. The moment the screen is separated from the frame, that factory seal is broken.
To restore this protection, we completely scrape away the old adhesive, clean the titanium frame with chemical solvents, and apply a brand-new, die-cut adhesive seal. While no repaired phone should be intentionally submerged, our professional process ensures your phone remains protected against everyday spills, rain, and splashes.
Can I replace my iPhone 16 Pro battery or charging port at the same time?
Absolutely! In fact, grouping repairs is a fantastic way to save both time and money. If your battery is struggling to hold a charge or your USB-C port feels loose, we can swap those out while we have the phone open.
To help you plan, here is how our rapid turnaround times break down:
- Screen Repairs: 10–15 minutes (performed right in front of you!)
- Battery Repairs: 30 minutes
- Charging Port Repairs: 1 hour
If you want to read up on battery health and replacement expectations, check out The Ultimate Guide to iPhone Battery Replacement and Costs. If you are feeling brave and want to see what a battery swap looks like under the hood, you can look over the iPhone 16 Pro Max Battery Replacement – iFixit Repair Guide.
Conclusion
A broken screen doesn’t have to ruin your week or drain your wallet. While the technical hurdles of the iPhone 16 Pro make DIY repairs incredibly risky, getting a professional, high-quality fix has never been easier.
At Salvation Repair, we serve communities across Mississippi — including Laurel, Jackson, Ellisville, Soso, Meridian, and throughout Jones County. We stand by our work with three simple promises:
- Unmatched Speed: Our screen repairs take just 10–15 minutes, and we perform them right in front of you so you never have to let your phone out of your sight.
- Lifetime Warranty: We offer a lifetime warranty on all our screen replacements. If the part fails due to a manufacturing defect, we will swap it out for free.
- Price Matching: We will match any local competitor’s verified price for the same repair.
If you are ready to bring your phone back to life, check out our handy local guides like Don’t Crack Under Pressure: Your iPhone 16 Pro Max Screen Repair Guide or read more about our philosophy at From Cracked to Pristine: Navigating Your iPhone 16 Screen Repair Journey.
Don’t let a cracked screen slow you down. Stop by Salvation Repair in Laurel, MS, today, and let us get your iPhone 16 Pro looking brand new again in the blink of an eye!