PS5 Damaged HDMI Port: Your Guide to Quick Fixes and Repairs
What to Do About a Damaged HDMI Port on Your PS5
A damaged HDMI port PS5 owners deal with is one of the most common — and most frustrating — console repair problems out there. Before you read any further, here’s the quick answer:
Quick Fix Summary: Damaged PS5 HDMI Port
| Symptom | Most Likely Cause | What to Do |
|---|---|---|
| No signal, white light on | Bent/broken port pins (~60% of cases) | Professional port replacement ($120–$150) |
| No signal, pins look fine | Failed HDMI encoder chip (~30%) | Encoder chip repair ($150–$250) |
| Flickering or intermittent display | Cracked solder joints or torn traces | Board-level repair ($150–$190) |
| Random shutdowns before no signal | APU failure (~10%) | Console replacement may be needed |
Stop using the console if you suspect port damage. Continued plugging and unplugging can make the damage worse and more expensive to fix.
You hit the power button. The fan spins. The light bar glows white. But your TV just says “No Signal.” It’s a gut-punch moment — especially when you were about to sit down for a long gaming session.
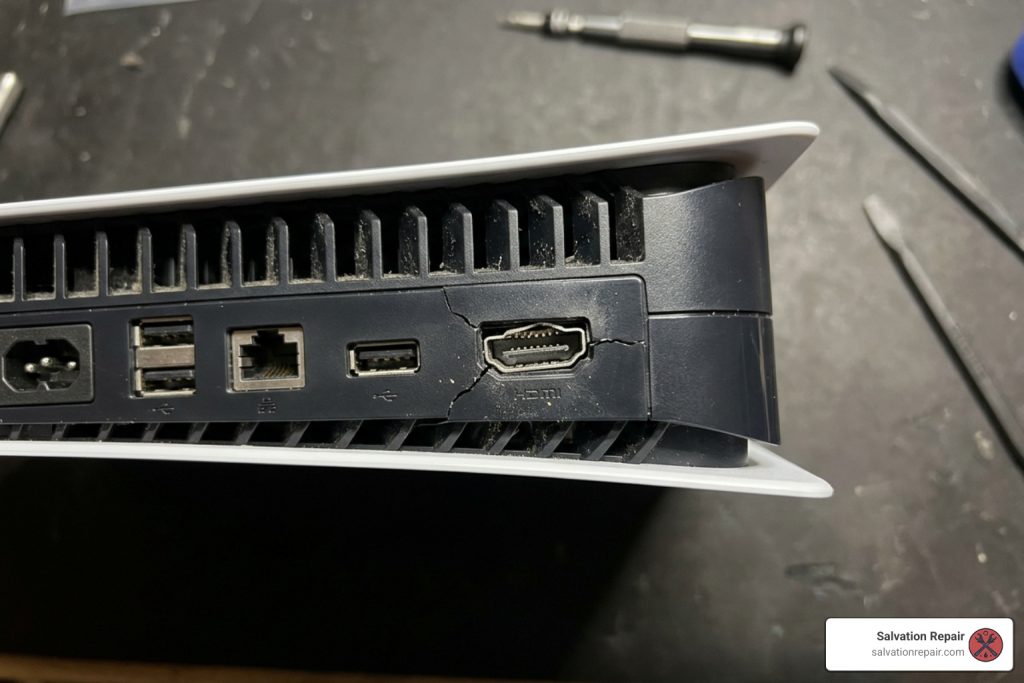
The PS5’s HDMI port sits on the back of the console where it takes the most physical stress of any component. It’s soldered directly to the motherboard, with no mechanical strain relief. One hard tug on the cable, one accidental bump, or one too many moves across the room — and those tiny 0.4mm pins can bend, break, or lift right off the board.
The good news? In most cases, this is a fixable problem — and far cheaper than buying a new console.
I’m Ralph Harris, a Wise Level 2 certified repair technician and Apple-certified repair specialist with over 20 years of hands-on experience in electronics repair, including gaming console work. I’ve personally diagnosed and overseen hundreds of damaged HDMI port PS5 cases across repair shops, and I’ll walk you through everything you need to know to get your console back on screen.

How to Diagnose a Damaged HDMI Port PS5
Before rushing to book a repair, you need to confirm that your console’s HDMI port is actually the culprit. Sometimes, a “No Signal” message is just a bad cable, a dirty port, or a confused TV input.
Let’s walk through our step-by-step diagnostic process to isolate the issue.
Step 1: The Visual Inspection (The Flashlight Test)
Grab a flashlight (or your phone’s light) and peer directly into the HDMI port on the back of your PS5. You are looking for:
- Bent or pushed-back pins: The PS5 HDMI port has 19 tiny gold-plated pins. If any of them are pushed backward, overlapping, or completely missing, you have a physically damaged hdmi port ps5 that requires replacement.
- Wobble or play: Gently wiggle the HDMI cable while it is plugged into the console. If the entire port moves or feels loose inside the housing, the solder joints anchoring it to the motherboard have cracked.
- Debris: Dust bunnies, pet hair, or pocket lint can block the pins from making contact.
Step 2: Rule Out the Cable and TV
It sounds simple, but a bad cable is the easiest fix.
- Swap the cable: Try a known-working HDMI 2.1 cable.
- Swap the TV port: TVs have multiple HDMI inputs. Plug the cable into a different port (e.g., HDMI 2 instead of HDMI 1) and make sure your TV source is set correctly.
- Test on another screen: Plug your PS5 into a different TV or monitor. If it works there, your main TV might have a bad port or a resolution mismatch.
Step 3: Try Booting in Safe Mode
If your console turns on with a solid white light but shows no display, try forcing it into a lower resolution via Safe Mode:
- Turn off your PS5 completely by holding the power button for three seconds.
- Once off, press and hold the power button again. Release it only after you hear a second beep (about 7 seconds after the first).
- Connect your DualSense controller via USB cable and press the PS button.
- If a menu appears, select “Change Video Output” and set the resolution to 1080p or lower.
If Safe Mode displays a picture but normal mode does not, your HDMI port’s high-bandwidth pins (responsible for 4K/120Hz signals) might be damaged while the basic low-resolution pins are still making contact. If you still see absolutely nothing, you might need our comprehensive walkthrough on How to Fix PS5 Slim No Display.

Diagnostic Comparison Table
| Issue | Visual Port Condition | Safe Mode Display | Other Symptoms |
|---|---|---|---|
| HDMI Port Damage | Bent pins, loose port, visible gaps | None (usually completely black) | Flickering when cable is wiggled |
| HDMI Encoder Chip Failure | Pins look completely perfect | None | Solid white light, TV detects connection but no image |
| APU / Solder Joint Failure | Pins look perfect | None | Blue Light of Death (BLOD), random shutdowns |
The Professional Repair Process and 2026 Cost Breakdown
If your diagnostic tests point to a hardware issue, it’s time to talk about professional repairs. In 2026, board-level repairs on the PlayStation 5 have become highly standardized, but they still require specialized equipment and microsoldering expertise.
Let’s break down what a professional repair involves and what you can expect to pay.
What Does the Repair Process Involve?
Replacing a damaged hdmi port ps5 is not a simple “plug-and-play” swap. The port is surface-mounted directly to the console’s mainboard. A proper professional repair involves:
- Complete Disassembly: The technician must carefully open the console, remove the fan, optical drive, power supply, and shields to extract the motherboard.
- Liquid Metal Management: The PS5 uses liquid metal instead of traditional thermal paste on the APU. Technicians must safely contain and protect this liquid metal during disassembly to prevent it from spilling onto other motherboard components and causing a permanent short.
- Desoldering the Old Port: Using a professional hot-air rework station set between 380°C and 420°C, the technician heats the motherboard’s ground anchors and 19 signal pins to safely lift the damaged port away.
- Pad and Trace Inspection: Under a microscope, the technician cleans the old solder from the pads. If the port was ripped out violently, motherboard traces (the tiny copper pathways) may be torn. These must be painstakingly rebuilt using micro-jumpers.
- Soldering the New Port: A high-quality, reinforced replacement port is aligned and soldered pin-by-pin under magnification.
- Testing and Reassembly: The board is thoroughly cleaned, liquid metal is reapplied, and the console is reassembled. Technicians then run stress tests at 4K/120Hz to ensure complete stability.
For a deeper look at this process, you can read our complete breakdown of PS5 HDMI Port Replacement.

2026 Cost Breakdown
How much should you expect to pay to fix a “No Signal” issue in 2026? According to our industry data and the PS5 HDMI Repair Cost (2026 Guide), costs vary based on the exact type of damage:
- Standard HDMI Port Replacement: $120 to $150. This covers a basic port swap where the motherboard pads are still intact.
- HDMI Port + Trace Repair: $150 to $190. Required when a cable yank has physically ripped the copper pads and traces off the motherboard, requiring micro-soldering reconstruction.
- HDMI Encoder Chip Work: $180 to $220+. If the port looks perfect but there is no display, the Panasonic MN86471A encoder chip (which converts the APU’s raw video signals) may have failed due to an electrical short or static discharge.
Common Causes of a Damaged HDMI Port PS5
Understanding why these ports fail so frequently is the first step in stopping it from happening again. According to bench statistics, physical stress is responsible for nearly 90% of all console HDMI failures.
- Cable Yanking and Tripping: The most common scenario. A pet, child, or vacuum cleaner catches the HDMI cable, pulling the console off its stand or putting massive lateral force on the port.
- Moving the Console While Plugged In: Many gamers pack up their PS5 to take to a friend’s house but leave the HDMI cable plugged in while moving it, putting heavy pressure on the internal pins.
- Tight Entertainment Centers: Shoving the PS5 backward into a shallow TV stand forces the HDMI cable to bend sharply against the back wall, slowly cracking the solder joints over time.
- Hot-Plugging (Electrical Shorts): Plugging or unplugging the HDMI cable while the TV and console are fully powered on can cause a tiny static spark. This can fry the sensitive HDMI ESD protection diodes or the Panasonic encoder chip.
For more information on these common failure points, you can read the PS5 HDMI Port Repair Guide.
Professional Repair vs. DIY for a Damaged HDMI Port PS5
We often see console owners attempt a DIY repair after watching a quick video online. However, we strongly advise against this unless you have extensive micro-soldering experience and professional-grade tools.
Here is why DIY attempts often go wrong:
- Inadequate Heat: Cheap soldering irons cannot generate or sustain the heat required to melt the lead-free solder on the PS5’s thick, heat-sinking ground planes. Attempting to pry the port off without fully melting the solder will instantly rip the delicate copper pads right off the motherboard.
- Liquid Metal Spills: If you do not handle the APU’s liquid metal barrier correctly, it can run onto the motherboard, causing permanent, unrepairable short circuits.
- Torn Traces: Rebuilding a 0.4mm trace under a microscope requires steady hands and specialized micro-jumpers. A single mistake can render the motherboard completely dead.
If you want to see what a proper replacement looks like, you can check out this video on How to Replace the HDMI Port on a PS5. For most gamers, paying a professional is far cheaper than buying a whole new motherboard after a failed DIY attempt.
How to Prevent Future HDMI Port Damage on Your Console
Once your console is repaired, you’ll want to make sure you never have to deal with this headache again. A few simple precautions can protect your port for years to come:
- Use a Flexible, High-Quality Cable: Avoid thick, stiff HDMI cables that do not bend easily. Stiff cables act like a lever, transferring every tiny movement directly into the port.
- Install a Right-Angle HDMI Adapter or Extender: A 90-degree adapter or a short, flexible HDMI extender cable plugs into your PS5 and stays there permanently. If anyone trips on the cord, the cheap adapter takes the wear and tear, protecting the motherboard’s port.
- Secure Your Cables: Use Velcro straps or cable clips to secure your HDMI cable to your TV stand. Leave plenty of slack behind the console so there is no tension pulling on the port.
- Always Unplug Before Moving: Never transport or shift your console with any cables plugged into the back.
- Keep Your Console Clean: Dust buildup can trap heat. While you’re protecting your ports, make sure your console’s cooling system is clean. If you also own older hardware, keeping up with maintenance like a PS4 Loud Fan Repair can help keep your entire setup running cool and quiet.
Salvation Repair: Fast and Reliable Device Fixes in Laurel, MS
If you are located in the Laurel, MS area or surrounding communities like Jackson, MS, Ellisville, MS, Soso, MS, Meridian, MS, or Jones County, Mississippi, you don’t have to ship your gaming gear away or wait weeks for a fix. At Salvation Repair, we specialize in high-quality, professional electronics repairs with a focus on speed, reliability, and customer satisfaction.
While we love bringing dead consoles back to life through expert Gaming Console Repair, we also fix “any device with a power button.”
Need a fast phone fix? We handle iPhone screen repairs in just 10-15 minutes, performed right in front of the customer. We offer multiple screen replacement tiers to fit your budget:
- Standard Screen Repairs: Standard LCD repairs are quoted at $129.95, aftermarket OLED at $129.95, and OEM at $149.95.
- iPhone 16 Pro: LCD at $149.95 and OLED at $199.95.
- iPhone 16 Pro Max: AQ7 LCD at $129.95, aftermarket OLED at $219.95, OEM refurbished at $399.95, and new OEM at $469.95.
We also offer 30-minute battery repairs and 1-hour charging port repairs to get you connected again fast. With our price-matching policy and a lifetime warranty on our work, you can rest easy knowing your tech is in expert hands.
Frequently Asked Questions about PS5 HDMI Repairs
Will I lose my saved game data during an HDMI repair?
No. Your game saves, downloaded games, and user profile data are stored on the PS5’s internal SSD. A standard HDMI port or encoder chip repair only affects the video output pathway on the motherboard. Because we do not touch or reset the SSD storage during the repair, your data remains completely safe.
How long does a professional PS5 HDMI port repair take?
The actual bench time for a clean desoldering and soldering job is about 90 minutes. However, a reputable shop will usually ask for 1 to 3 business days. This extra time allows for thorough diagnostic testing, liquid metal reapplication, and extensive burn-in testing at high resolutions (4K/120Hz) to guarantee the repair holds under heavy gaming stress.
Can a bad TV or cheap HDMI cable damage my PS5 port?
Yes, in two ways. Physically, stiff or poorly manufactured cables can fit too tightly or sit at an angle, bending the internal pins. Electrically, “hot-plugging” a cheap cable into a poorly grounded TV can cause a static discharge that bypasses ESD protection and fries the HDMI encoder chip inside your console. Always turn off your devices before connecting or disconnecting HDMI cables.
Conclusion
A damaged HDMI port PS5 issue can feel like the end of your console’s life, but it is actually one of the most common and successfully repaired hardware faults we see. Investing in a professional board-level repair is highly cost-effective, saving you hundreds of dollars compared to buying a brand-new console, while keeping your hard-earned save data intact and reducing electronic waste.
If you are ready to get your console back in the game, visit our Gaming Console Repair page to get a quote or book your repair with Salvation Repair today!