
The Ultimate PS5 Slim Power Supply Switch Repair Guide
What Is the PS5 Slim Power Supply Switch — and Why It Matters
The PS5 Slim power supply switch is one of the most misunderstood components on Sony’s compact console. Here’s the quick answer most people need:
The PS5 Slim does not have a physical rear power supply toggle switch. Power is controlled entirely through the front power button and the console’s software menu. If your console won’t turn on, the issue is almost always the internal power supply unit (PSU) — not a missing switch.
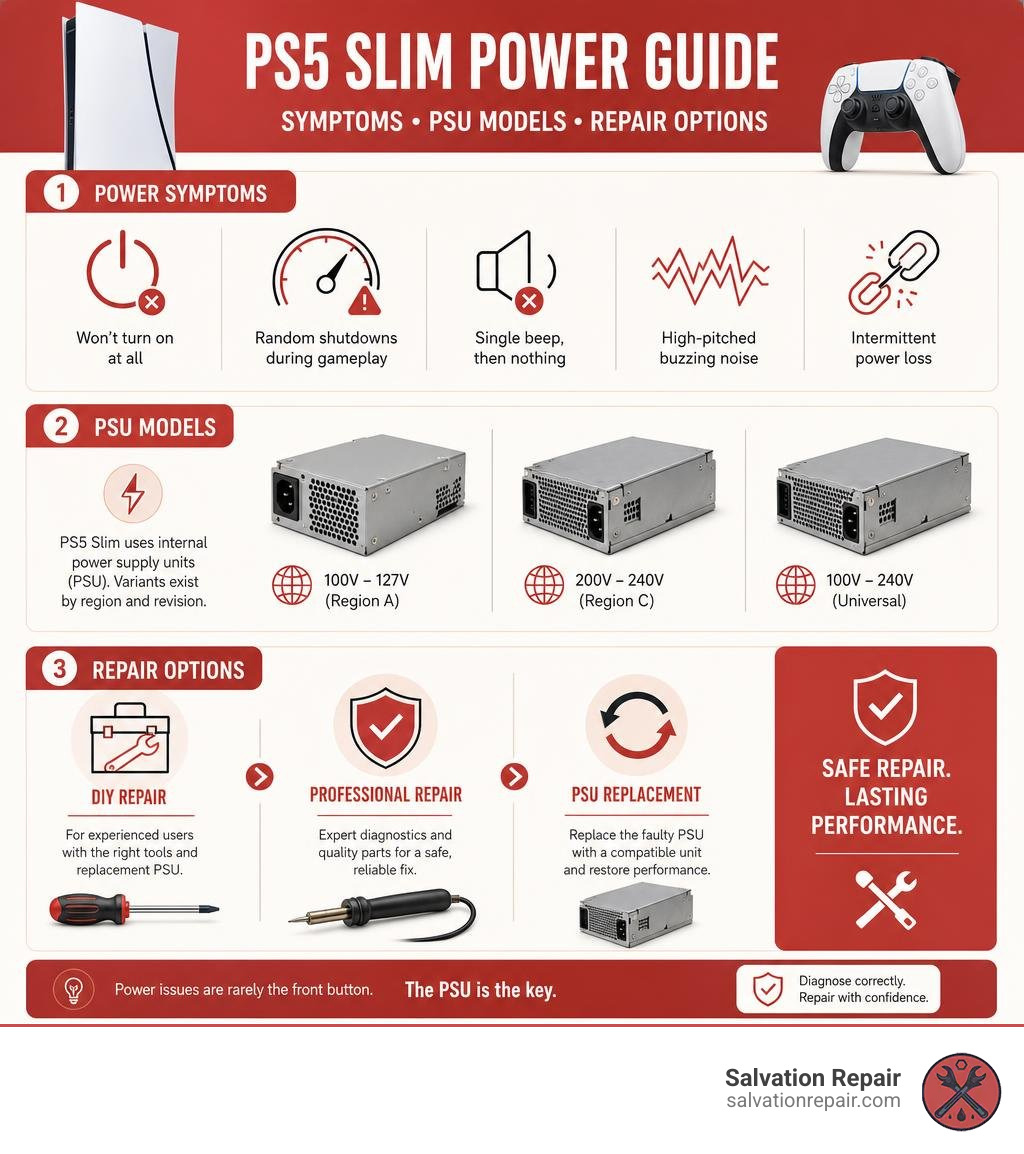
Common PS5 Slim power supply problems and what they mean:
| Symptom | Likely Cause |
|---|---|
| Console won’t turn on at all | Failed internal PSU or blown fuse |
| Random shutdowns during gameplay | Degraded PSU under electrical stress |
| Single beep, then nothing | Power rail failure or short circuit |
| High-pitched buzzing noise | PSU capacitor stress or failure |
| Intermittent power loss | Failing PSU or loose power connection |
If you’re seeing any of these symptoms, you’re in the right place. This guide covers everything — from diagnosing the problem and comparing replacement PSU models, to a full step-by-step teardown and your professional repair options in Laurel, MS.
I’m Ralph Harris, a Wise Level 2 certified technician and certified Apple repair specialist with over 20 years of hands-on electronics repair experience — including extensive work on gaming consoles like the PS5 Slim and its notoriously tricky PS5 Slim power supply switch and internal PSU systems. Let’s walk through every option so you can make the best call for your situation.
Troubleshooting PS5 Slim Power Issues Before Replacement
Before you order a replacement power supply or grab your screwdriver set, we always recommend doing some basic diagnostics. Sometimes, what looks like a completely dead internal power supply is actually an external issue or a minor system glitch that can be resolved without opening the console.
Start by checking your power cord and wall outlet. It sounds simple, but a loose cable or a tripped circuit breaker is more common than you think. Try plugging another device into the same outlet to confirm it has power, and inspect your PS5 power cord for any visible tears, kinks, or bent prongs.
If the outlet and cable are fine, try to boot your console into Safe Mode. To do this, hold down the front power button for about seven seconds. You should hear an initial beep when you first press it, followed by a second beep seven seconds later. If the console beeps twice and boots into Safe Mode, your hardware is likely intact, and you are dealing with a software or database issue. For a deeper look into these specific power-on glitches, check out our guide on PS5 Slim Power Issues: Fixing the Single Beep Mystery.
Demystifying the PS5 Slim Power Supply Switch and Button Layout
One of the most frequent questions we get at Salvation Repair is, “Where is the physical PS5 Slim power supply switch on the back?”
Unlike older desktop computers or certain retro gaming consoles, the PS5 Slim does not feature a mechanical rocker switch on the rear of the unit. Instead, it relies on a momentary front power button and sophisticated software-controlled power states.
According to the official PlayStation®5 Support Guide, the power button is located on the front of the console, near the bottom feet and the USB Type-C ports. Because there is no rear hard-off switch, the console is designed to manage power delivery dynamically. When you select “Turn Off PS5” from the system menu, the console performs a controlled shutdown, saving your data before cutting power to the main processing board.
Unplugging the power cord while the white light is blinking can cause severe operating system corruption. If your console is completely frozen and won’t respond to menu commands, you can force a standard shutdown by holding the front power button for three seconds.
Identifying Symptoms of a Failing Power Supply
If you have ruled out external cables and software glitches, it’s time to look at the internal hardware. A failing PS5 Slim power supply unit (PSU) typically shows very specific warning signs:
- The Single Beep Shutoff: You press the power button, the console lets out a single beep, the blue light flashes for a split second, and then the system completely dies. Pressing the button again does nothing unless you unplug the AC cord, wait 30 seconds, and plug it back in.
- Sudden Shutdowns Under Load: Your console powers on fine, and you can navigate the home screen without issues. However, five to ten minutes into a graphically demanding game, the console turns off instantly with no warning or error message. This happens because the degraded PSU can no longer supply the high amperage required by the CPU and GPU under heavy loads.
- High-Pitched Buzzing (Coil Whine): While a faint hum is normal, a loud, high-pitched buzzing or electrical whining noise coming from the back of the console indicates that the internal capacitors or inductors inside the power supply are under extreme electrical stress and are close to failing.
- No Power, No Beep, No Light: The console is completely dead. There are no sounds, no lights, and no signs of life whatsoever when you press the power button.
Choosing the Right PS5 Slim Power Supply Switch Replacement
If your diagnostics point to a dead PSU, you will need to source a compatible replacement. Sony has released several revisions of the PlayStation 5, and the internal power supplies are not universally interchangeable. Installing a power supply designed for an older “fat” PS5 model into a PS5 Slim will not work physically or electrically, and could permanently ruin your motherboard.
| Console Revision | Model Group | Compatible PSU Model | Power Output | Connection Style |
|---|---|---|---|---|
| PS5 Original (Fat) | CFI-1000 / 1100 / 1200 | ADP-400DR / ADP-400ER / ADP-400FR | 400W | Dual-prong + Cable |
| PS5 Slim | CFI-2000 / 2100 | ADP-400GR | 400W | Direct Rigid Metal Prongs |
The PS5 Slim (which falls under the CFI-2000 and CFI-2100 model groups) utilizes the ADP-400GR power supply unit. This model is engineered specifically for the Slim’s smaller chassis. It supports global dual-voltage inputs (100-127V and 200-240V) and outputs a stable 400W.
Before purchasing any replacement part, always verify your console’s model number on the bottom or back panel to ensure compatibility. For a highly detailed analysis of this specific power architecture, you can read the resource Is Your PS5 Slim Dead? A Deep Dive into the ADP-400GR Power Supply Replacement.
Where to Buy a Compatible PS5 Slim Power Supply Switch
When shopping for a replacement power supply, you have a few options:
- Amazon: You can find compatible CFI-2000 power supplies on Ps5 Power Supply for around $99.99. These parts are highly popular, with over 50 units purchased monthly, and they often come with fast shipping options.
- Walmart: Walmart’s online marketplace frequently lists options like the Replacement Power Supply ADP-400DR Compatible With …, though you must be careful to select the correct “GR” model for the Slim rather than the “DR” model meant for older revisions.
- AliExpress: If you are willing to wait for international shipping, AliExpress offers the ADP-400GR directly from electronics wholesalers for a lower price, usually ranging between $30 and $50.
The Truth About Tamper-Evident Stickers and Warranty Rights
During the disassembly process, you will encounter a black tamper-evident sticker covering one of the key chassis screws. Many manufacturers use these “Warranty Void If Removed” labels to discourage users from opening their consoles.
However, if you live in the United States, you are protected by the Magnuson-Moss Warranty Act. Under federal law, it is illegal for a manufacturer to void your hardware warranty simply because you opened the device or performed a self-repair, provided you did not cause damage to the system during the process. These stickers are largely a psychological barrier. Don’t let them intimidate you!
Step-by-Step PS5 Slim Power Supply Switch Replacement Guide
If you have decided to tackle this repair yourself, preparation is key. This is a complex teardown that requires patience and precision. You will be managing screws of at least seven different lengths, ranging from 7.5 mm to 31.2 mm. Mixing up these screws can cause them to pierce the motherboard during reassembly, resulting in a permanent short circuit.
Before you begin, make sure to read the PlayStation 5 Slim Power Supply Replacement – iFixit Repair Guide for visual reference.
Tools Required for the Disassembly
To complete this repair safely, gather the following tools:
- A T8 Torx Security screwdriver (essential for Sony’s proprietary security screws)
- A standard Phillips #1 screwdriver
- A plastic spudger or opening tool
- Precision tweezers
- A multi-compartment screw tray (to keep track of different screw lengths)
- An anti-static wrist strap
Removing the Outer Covers and Modular Disc Drive
- Power Down & Discharge: Safely shut down the console. Unplug the AC power cord and wait at least 30 seconds to allow the high-voltage capacitors inside the power supply to discharge completely.
- Remove the Stands: Take off any vertical or horizontal support stands.
- Pop the Outer Plates: Lay the console flat. Gently but firmly pull up on the front edges of the outer plastic covers to release the securing clips. You will hear a distinct popping sound as they detach.
- Remove the Modular Disc Drive: If you have the disc version, the drive can be removed entirely without tools. Simply lift the drive straight up and away from its modular connector, as detailed in the official PlayStation®5 Instruction Manual.
Disconnecting the Fan, Antenna, and Interconnect Cables
- Remove the Fan Cover: Use your T8 Torx Security screwdriver to remove the screws holding the plastic fan cable cover in place.
- Disconnect the Fan: Carefully slide the fan cable out from its routing clips. Gently pull the fan connector straight up out of its socket on the motherboard. Do not pull by the wires; use tweezers or your fingers to grip the plastic connector housing.
- Unscrew the Fan: Remove the four fan screws (note that these are of three different lengths!) and lift the fan out. This is a great opportunity to clean out any dust buildup with a clean cloth.
- Remove the Right-Side Inner Shell: Flip the console over. Use tweezers to peel up the black tamper-evident sticker. Remove the nine screws securing the right-side inner shell, keeping track of their varying lengths, and lift the shell away.
- Disconnect the Interconnect Cable: Locate the silver interconnect cable cover. Remove its screws, take off the cover, and use a spudger to push the small metal locking latch down and away from the connector to unlock it before pulling the ribbon cable out.
- Disconnect the Antenna Cables: Carefully pop the coaxial antenna cables off their motherboard sockets. Pull straight up, and do not force them, as these sockets are incredibly fragile.
Safely Detaching the Power Supply from the Main Board
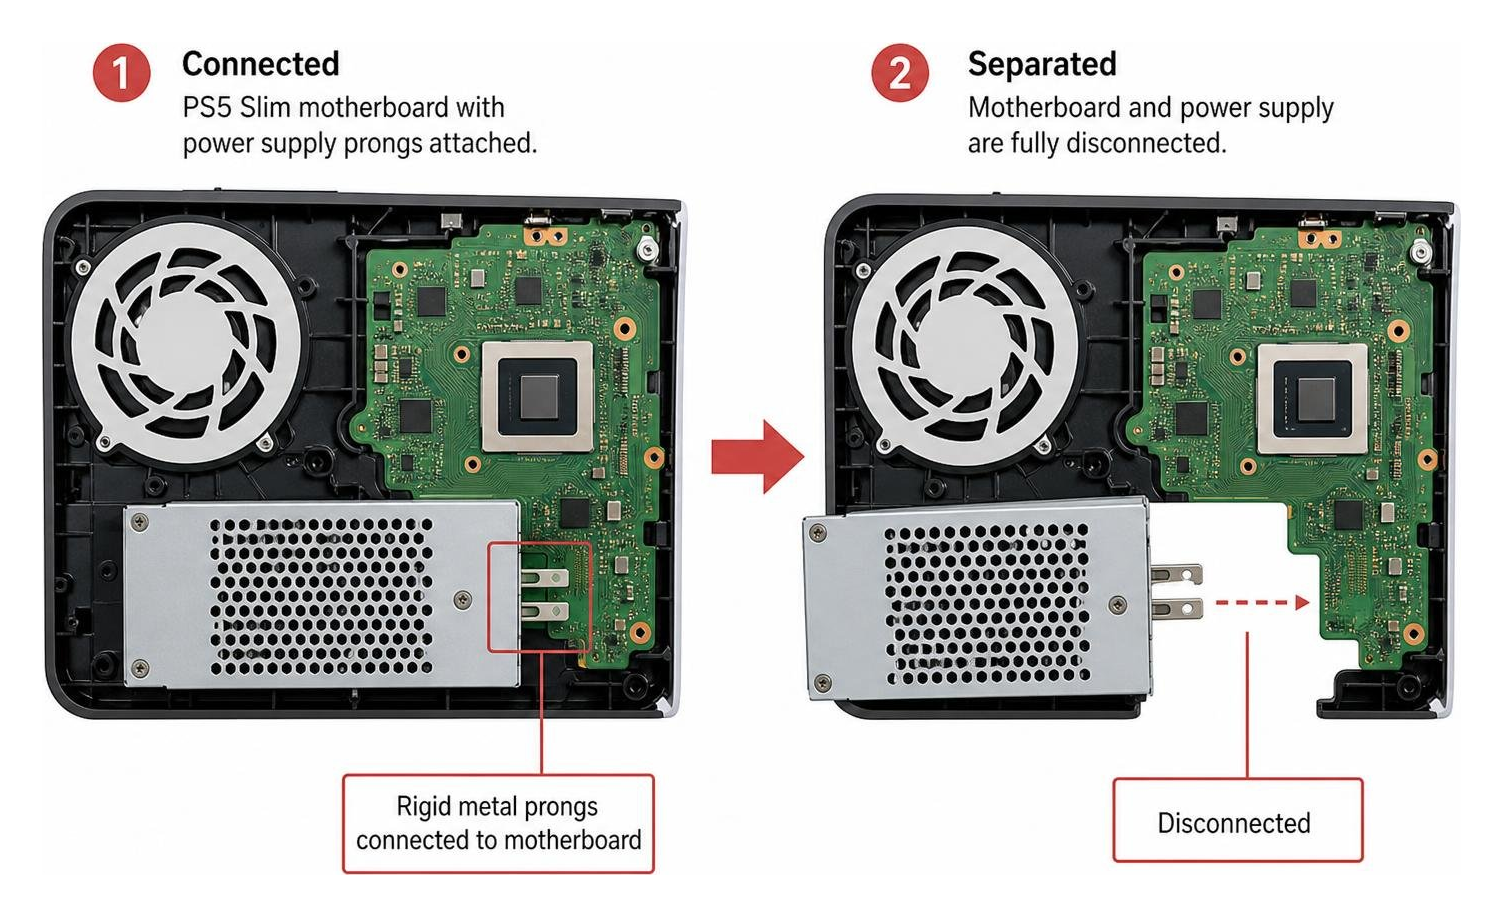
Unlike older console designs that use a flexible cable harness, the PS5 Slim’s power supply connects directly to the bottom left corner of the main board assembly using rigid metal prongs.
- Lift the Main Board Assembly: Gently lift the bottom left corner of the main board assembly off its plastic post.
- Apply Counter-Pressure: While lifting the main board, press down firmly on the power supply housing. The plastic housing of the console will flex significantly here — this is normal, but proceed slowly.
- Separate the Prongs: Pull the main board and the power supply apart to slide the board off the tight metal connection prongs. Never grab or lift the main board by its copper heat pipes or cooling fins, as they bend easily and can permanently damage the thermal system.
- Remove the PSU: Once separated, slide the old power supply out of the chassis.
Testing and Reassembling Your Console
To install your new power supply, place it flat in the bay and reverse the disassembly steps. When lowering the main board back down, ensure that the delicate interconnect and antenna cables do not get trapped underneath.
If you are an advanced DIYer or technician wanting to test the board’s standby state before full reassembly, refer to the PS5 Power Supply Schematics Guide | PDF | Video Game Consoles | Manufactured Goods.
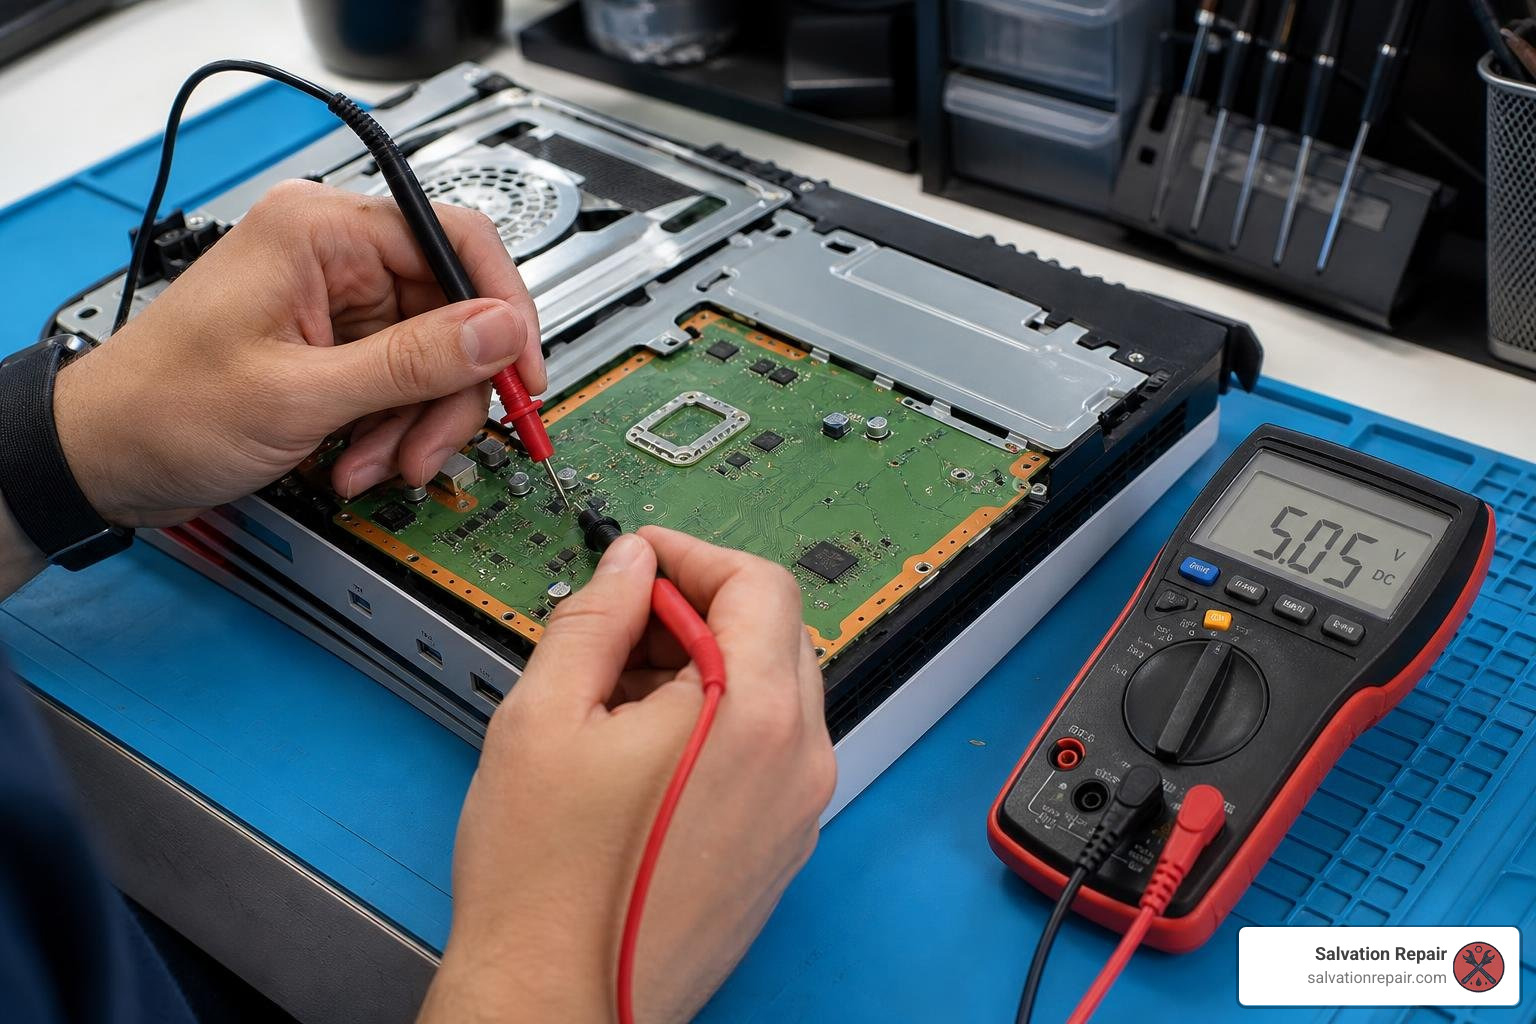
You can use a multimeter to check the standby fuses (F7001, F7002, F7003, and F7502, which are all rated at 5A). The main standby rail, known as 5V_EVER, is stepped down from the main 12V_MAIN line. If you measure a steady 5V on these lines when the console is plugged in, your standby circuit is healthy, and the front power button should successfully signal the Southbridge (IC5006) to boot the console.
Professional Repair Options vs. DIY
While a DIY repair can save you money, it is not without risk. The PS5 Slim is a highly compacted, complex piece of engineering. Common mistakes during self-repair include:
- Stripping the proprietary T8 Torx Security screws by using the wrong screwdriver size.
- Ripping the delicate fan socket or antenna connectors off the motherboard.
- Bending the copper heat pipes, leading to immediate console overheating.
- Mixing up the screw lengths, resulting in a screw piercing the multi-layered motherboard.
If you don’t have the specialized tools, or if you feel uncomfortable handling high-voltage power supplies and fragile ribbon cables, we are here to help. At Salvation Repair, we provide fast, professional Gaming Console Repair services in the Laurel, MS area.
Whether you need a power supply replacement, a PS5 HDMI Port Replacement, or advanced motherboard diagnostics, our experienced team can get your console back in perfect working order safely.
Mobile Device Screen and Hardware Repair Standards
At Salvation Repair, our commitment to quality extends far beyond gaming consoles. We apply the same rigorous, professional standards to mobile devices.
If you need an iPhone screen repair, we clearly distinguish between our screen options so you can choose the best fit for your budget:
- Standard Screen Repairs: Standard LCD repairs are quoted at $129.95, aftermarket OLED at $129.95, and OEM at $149.95.
- iPhone 16 Pro Repairs: We quote LCD repairs at $149.95 and OLED repairs at $199.95.
- iPhone 16 Pro Max Repairs: We quote AQ7 LCD at $129.95, aftermarket OLED at $219.95, OEM refurbished at $399.95, and new OEM at $469.95.
We value your time, which is why our mobile repairs are designed to fit your busy schedule. iPhone screen repairs take just 10 to 15 minutes and are performed directly in front of the customer. Battery repairs take 30 minutes, and charging port repairs take only 1 hour.
Frequently Asked Questions about the PS5 Slim Power Supply Switch
Why does my PS5 Slim beep once and turn off?
This is usually caused by a short circuit on one of the main power rails of the motherboard, or a complete failure of the internal power supply’s 12V_MAIN line. When you press the power button, the system attempts to boot, detects an abnormal electrical draw, and immediately shuts down to protect the APU from damage. If you are also dealing with display issues, our guide on How to Fix PS5 Slim No Display in 5 Steps can help you narrow down the cause.
Is the PS5 Slim power supply dual voltage?
Yes. The official ADP-400GR power supply unit used in the PS5 Slim is globally compatible. It supports input voltages ranging from 100-127V and 200-240V at 50/60 Hz. This means you can safely use your console anywhere in the world without needing a step-down voltage transformer.
Can I damage my motherboard during a PSU replacement?
Yes, this is a very common risk during a DIY repair. Because the power supply connects directly to the motherboard via rigid metal prongs, separating the two components requires a fair amount of physical force. If you pull at an incorrect angle, or if you grab the board by the copper heat pipes or delicate cooling fins, you can easily flex and crack the motherboard or damage its traces.
Conclusion
A failing power supply doesn’t mean your PlayStation 5 Slim is destined for the electronics recycling bin. Whether you choose to source an ADP-400GR PSU and tackle the repair yourself, or prefer to leave the delicate board work to the experts, restoring your console is highly cost-effective compared to buying a brand-new system.
If you decide that a professional touch is the safest route, we invite you to visit us at Salvation Repair. We proudly serve communities across Mississippi, including Laurel, Jackson, Ellisville, Soso, Meridian, and throughout Jones County.
We stand behind our work with a lifetime warranty, offer price matching to ensure you get the best deal, and live by our motto: we can repair “any device with a power button.”
Don’t let a dead power supply keep you out of the game. Contact us or stop by today to Get professional gaming console repair in Laurel, MS, and let our team get you back to playing.
